

|Articles|December 19, 2012
A safer way to place chest tubes
This technique involving a little soft tissue dissection reduces the chance of iatrogenic damage during placement.
Advertisement
You might consider placing a large-bore chest tube if repeated thoracentesis is required to remove fluid or air accumulation in a patient's thoracic cavity. Chest tubes are also used after thoracotomy to monitor air leakage or hemorrhage or to administer local anesthetic drugs.
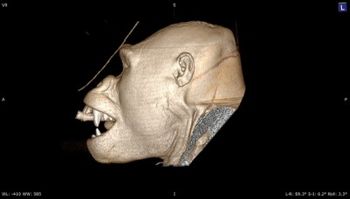
Although infrequent, improper chest tube placement can result in damage to vital intrathoracic structures such as the lung, heart or great vessels (Photo 1). A commonly described technique for placement involves holding the tube perpendicular to the chest wall and forcing it in with a hard and sharp blow.
Photo 1: Inappropriately placed chest tubes can cause damage to intrathoracic structures. This intraoperative image shows perforation of a lung lobe with a chest tube.
An alternative technique, described here, involves dissection of the soft tissues before chest tube placement. With this technique less force is then needed to enter the thoracic cavity, which may be helpful in preventing damage to underlying structures.
Equipment needed
To perform this technique, you'll need the help of an assistant as well as the following materials:
• Sterile gloves
• A scalpel handle and scalpel blade-No. 10 or 15
• Kelly forceps or similar
• Needle holders
• Suture material-monofilament nylon or polypropylene (2-0 for most dogs, 3-0 for cats and small dogs)
Advertisement
• A Christmas tree adapter that sits firmly on the end of the tube
• A three-way stopcock
• A C-clamp
• A zip tie or 20-ga orthopedic wire to secure the tube.
Different chest tubes are available, but most have a sharp trocar, a radiopaque line running up one side and two fenestrations at the end of the tube.
Placing the tube
Anesthetize the patient for chest tube placement. Before placing the chest tube, you may need to perform a thoracentesis for stabilization before or during general anesthesia. Place the animal in lateral recumbency, and clip and prepare the thorax aseptically. Use a sterile technique throughout the chest tube placement procedure.
Although rarely necessary, additional fenestrations may be added to the tube by using sterile scissors or a scalpel blade. The fenestrations should not exceed one-third the diameter of the tube. Ensure the last fenestration (the one farthest away from the tube's tip) crosses the radiopaque line of the chest tube. This allows it to be seen on radiographs, ensuring that all fenestrations are within the chest cavity.
The entry point for the chest tube is typically the seventh, eighth or ninth intercostal space off the cranial aspect of the rib. Aim for the highest point of the chest with the animal lying on its side. This point tends to be in the dorsal part of the middle third of the chest.
Measure the tube from the eighth intercostal space to just caudal to the thoracic inlet. Take note of this measurement by using the markings along the tube. Mark the eighth intercostal space with your finger just above the skin. Hold your finger in place while your assistant grasps the skin on the thoracic wall and pulls it cranially. This step will eventually create a subcutaneous tunnel around the tube about three intercostal spaces long, which reduces leakage of air and fluid around the tube.
While your assistant maintains cranial traction on the skin, use a scalpel blade to make an incision over the eighth intercostal space into the subcutaneous tissue just larger than the chest tube's diameter. With Kelly forceps, bluntly dissect through the subcutaneous tissues and muscle layers of the thoracic wall. Be careful as you approach the pleura to avoid iatrogenic damage to intrathoracic structures. The pleura can be gently penetrated using blunt dissection.
If you've dissected through the pleura, it should take very little force to place the chest tube into the thorax. If some tissue remains, a little pressure may be required. Hold the tube with a firm two-handed grip and your thumb about 1 cm from the end of the tube. Then with a short and controlled movement, penetrate the remaining pleura to enter the chest.
As soon as the tip of the chest tube is within the thoracic cavity, flatten the remainder of the tube along the thoracic wall, and slide the tube cranially another 2 to 3 cm. Once you're sure the tube's tip is within the thoracic cavity, remove the trocar as you advance the tube ventrally and cranially to the measurement you previously took note of (the distance between thoracic inlet and eighth intercostal space). The aim is to have the tube lie along the sternum and stop around the level of the first rib.
At this point, your assistant can release the skin over the chest tube. As the skin returns to its normal position, it creates a subcutaneous tunnel.
Securing the tube
Once the chest tube is in place, insert the Christmas tree adapter into the end of the tube attached to a three-way stopcock. Aspirate the tube to remove any air that accumulated in the chest during tube placement. Secure the tube itself by placing a single interrupted suture in the subcutaneous tunnel around the tube to reduce air or fluid leakage.
Place a purse string in the skin incision around the tube, followed by a Chinese finger trap. For extra security, place a C-clamp on the tube between the Christmas tree adaptor and the chest wall. Also place a zip tie or orthopedic wire around the tube at the level of the Christmas tree to reduce the chance of dislodgement.
Always obtain radiographs after chest tube placement to check the position of the tube and to confirm that all of the tube fenestrations are within the chest cavity (Photos 2A and 2B).
Photo 2A: A radiograph obtained after chest tube placement to verify correct tube positioning. This tube enters the thorax at the seventh intercostal space and runs cranially and ventrally to lie caudal to the thoracic inlet. Note the fenestration in the tube is visible as it crosses the radiopaque marking strip.
Photo 2B: A radiograph obtained after chest tube placement to verify correct tube positioning. This tube enters the thorax at the seventh intercostal space and runs cranially and ventrally to lie caudal to the thoracic inlet. Note the fenestration in the tube is visible as it crosses the radiopaque marking strip.
Cover the incision around the tube with a nonadherent dressing. Then bandage the whole chest to secure the tube (Photo 3). The skin incision should be inspected daily for signs of infection.
Photo 3: Secure chest tubes with a chest wrap to help prevent dislodgement by the patient.
Removing the tube
The timing of chest tube removal varies depending on the underlying pathogenesis. In the case of pneumothorax, tubes are often removed 24 hours after no air has been aspirated. When they're placed for removal of excess fluid, they're typically removed once the daily fluid volume has declined to around 2 ml/kg/day, which is thought to be the amount of fluid produced from tube irritation itself. Chest tubes may need to be removed early if they are no longer working (become obstructed with a clot), if they are causing complications (e.g., subcutaneous fluid or air leakage) or if the daily fluid volume removed has plateaued at a level at which the patient can safely maintain.
To remove the tube, cut the sutures around it. Then gently pull the tube from the thorax. Close the skin incision with one to two skin staples. Closure can typically be performed with the animal awake. It is recommended to take a chest radiograph before chest tube removal and 12 to 24 hours after removal to check for excessive build-up of air or fluid.
Advertisement
Related Content
Advertisement

Latest CME


Advertisement
Advertisement
Trending on dvm360
1
Tornado (the dog) touches down at the emergency department
2
Every 30 extra minutes under anesthesia raises complication risk in brachycephalic patients, underscoring the importance of peri-anesthetic management
3
Q&A with an emergency veterinarian on critical care and common ER misconceptions
4
Paws and profits: VetEvolve names first chief veterinary officer, NVA appoints two board members, and more updates
5