

|Articles|April 1, 2012
Skills Laboratory: How to perform a caudal superficial epigastric flap
Use this axial pattern flap to treat ipsilateral or contralateral wounds on the perineum, hindlimbs, or mid torso.
Advertisement
When a wound is sizable and the surrounding skin is insufficient for closure, you must turn to alternative methods of wound coverage. The caudal superficial epigastric flap is a versatile axial pattern flap that can be used to cover such wounds on the ipsilateral or contralateral caudal to mid torso, perineum, or hindlimbs.
In dogs and cats, direct cutaneous arteries emerge through the body wall, turn parallel to the skin, and run along the cutaneous muscle, sending innumerable branches (the subdermal plexus) to the overlying dermis and epidermis. An axial pattern flap, such as the caudal superficial epigastric flap, has a direct cutaneous artery and vein entering its base, and the flap's shape and size reflect the artery's angiosome (the entire subdermal plexus fed by that artery). Because an axial pattern flap has a robust blood supply, it can be twice as long as a subdermal plexus flap, which is not based on a direct cutaneous artery. The axial pattern flap may be used for wounds that lack a healthy granulation bed or have exposed bone or tendon if continued open management of the wound is not an option.
See the step-by-step instructions on how to place caudal superficial epigastric flaps in dogs or cats starting on the next page. The photos are of a serval (African wild cat) with a mid-to-left perineal wound treated with a left caudal superficial epigastric flap and an Australian heeler dog with a right thigh wound treated with a left caudal superficial epigastric flap (as well as a right flank fold flap).
Step 1: Review the anatomy
Figure A
The caudal superficial epigastric flap is based on the caudal superficial epigastric artery, which arises from the external pudendal artery after the latter exits the superficial inguinal ring. This artery runs cranially along the ventral body wall, deep to the mammary glands, and provides blood to the glands and skin (Figure A).
Figure B
The caudal superficial epigastric flap will be elevated between the muscle fascia and subcutaneous tissue, deep to the mammary glands, after freeing the medial, cranial, and lateral aspects of the flap (Figure B).
Figure C
An island flap is created when the caudal aspect of the flap is also incised (Figure C).
Step 2: Assess the feasibility of a caudal superficial epigastric flap
In thin animals such as this serval, the caudal superficial epigastric artery may be visible through the skin (see photo). In other animals, estimate its origin at the level of the superficial inguinal ring. Determine if a caudal superficial epigastric flap would be long enough to cover the wound by measuring 1) the length (dashed line) of the caudal superficial epigastric flap from the origin of the caudal superficial epigastric artery to midway between the first two mammary glands and 2) the distance from the base of the flap to the farthest-most point of the wound. Take into account that some length will be lost as the flap is rotated. The flap can be shorter than described above; the length is based on the size and location of the wound. It is best to make the flap a bit longer than you think will be needed since it can always be trimmed shorter but cannot be made longer once you cut.
Step 3: Prepare the patient and wound
After administering general anesthesia, place the patient in dorsal or lateral recumbency to allow simultaneous access to the planned caudal superficial epigastric flap (dashed lines) and wound. A hanging leg preparation (as shown in the photo) is particularly helpful when the flap is to be rotated onto the limb. Clip wide margins around the donor site and wound before aseptically preparing the entire surgical field. Make sure the skin to be manipulated during surgery is not trapped under the body or restrained by towel clamps as the patient is placed on the operating table and surgically draped.
Using sterile technique, débride and lavage the wound if it does not contain healthy granulation tissue. Chronic or contaminated wounds should then be cultured for aerobic and anaerobic bacteria. Undermine the skin around the wound to create a free edge to which the caudal superficial epigastric flap will be sutured. Cover the wound with moist gauze.
Advertisement
Step 4: Draw the flap
Draw the boundaries of the flap (dashed and dotted lines) with a sterile wound marker. The medial border is on the ventral midline from the pubis to a point between the first and second mammary glands; in male dogs, the caudal part of the medial border includes the base of the prepuce. The lateral border should be parallel and equal in length to the medial border. It is placed a distance of X lateral to the nipples, where X = the distance from the ventral midline to the nipples.
The cranial border connects the cranial aspects of the medial and lateral borders between the first and second mammary glands. If the flap needs to be rotated 180 degrees, connect the caudal ends of the lateral and medial borders (dotted line) to create an island flap that is only attached to the body by the caudal superficial epigastric artery and vein. For lesser rotation, leave the caudal border uncut so as to better protect the flap's blood supply.
Step 5: Cut and undermine the flap
Incise the borders of the flap down to the external muscle fascia of the body wall. Undermine the flap from cranial to caudal, staying just superficial to the muscle fascia so that the subcutaneous and mammary tissues remain with the skin. Take extra caution as your dissection nears the base of the flap so the artery is not damaged. Leave as much soft tissue around the artery as possible while still allowing for flap rotation. It is not necessary to visualize the artery. Keep the deep side of the flap moist.
Step 6: Make a bridging incision
Make two parallel bridging incisions from the base of the flap to the wound (dashed lines). The distance between these incisions should be slightly less than the width of the flap so that the flap can later be sutured to the edges of the bridging incision without tension. (Note how the flap shrinks temporarily as the skin edges retract when they are cut and undermined. The bridging incisions are spaced to fit the original width of the flap, before it was cut.) Undermine and remove the strip of skin between the two parallel incisions, leaving subcutaneous tissue in the path (bridge) between the base of the flap and the wound. When the flap is rotated to the wound, the deep surface of the flap will be in contact with this bridge of subcutaneous tissue (not skin) and can heal to it.
Step 7: Rotate the flap onto the wound
Figure A
Remove the moist gauze from the wound bed, and rotate the flap onto the wound (Figure A). Be careful not to kink the caudal superficial epigastric artery. The flap will stretch back to its original width.
Figure B
Use penetrating towel clamps to hold the edges of the flap to the edges of the wound (Figure B), finding the orientation where wound coverage is highest and tension is lowest. Multiple flap positions may need to be tried, taking into account the patient's normal standing position and the forces that occur during walking to determine the optimal flap position.
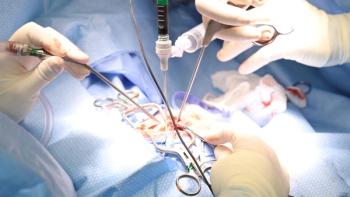
Step 8: Drain
Fluid accumulation deep to the flap can prevent the flap from healing in place. If needed, use a drain-preferably closed-suction like the Jackson-Pratt drain shown in the photo-not tacking or walking sutures to close dead space. Tacking and walking sutures can damage the caudal superficial epigastric artery and cause flap necrosis. Do not exit the drain through the caudal superficial epigastric flap, as this may also compromise the caudal superficial epigastric artery.
Step 9: Close the recipient and donor sites
Figure A
Suture the flap (dotted line) to the edges of the wound and bridging incision with subcutaneous and dermal sutures. If the flap does not cover the entire wound, the uncovered area may be closed by using other reconstructive techniques (e.g. a flank fold flap as shown in Figure A) or bandaged and allowed to heal by second intention. Close the donor site with subcutaneous and dermal sutures after undermining skin edges. Considerable undermining and multiple layers of walking sutures are commonly needed to bring the donor site edges together.
Figure B
Hair growth on the healed caudal superficial epigastric flap will be the same as it was at the donor site (Figure B). Mammary glands rotated with the caudal superficial epigastric flap remain functional and can be used successfully to nurse.
If a celiotomy is performed in the same surgery as the caudal superficial epigastric flap, perform the abdominal surgery first. After closing the linea alba, create the caudal superficial epigastric flap, with the medial border of the flap incorporating the skin and subcutaneous portions of the abdominal incision.
<
Postoperative care
Avoid bandages, which can put pressure on the base of the flap, compromising its blood supply. Protect incisions and drains with a light wrap or a stockinette shirt and an Elizabethan collar. Avoid directly icing the flap because of the risk of compromising the blood supply through vasoconstriction.
Pain can be substantial, so intraoperative and postoperative analgesia are essential. Epidural anesthesia can be helpful. Systemic opioids and nonsteroidal anti-inflammatory drugs are typically given for 24 to 48 hours after surgery if not contraindicated by the patient's health. Instruct owners to administer oral analgesics for one or two weeks.
The distal end of the flap is the most susceptible to necrosis or dehiscence since it is farthest from the origin of the caudal superficial artery and often under the most tension. Necrotic or dehisced areas should be lavaged and débrided as needed and allowed to heal by second intention or surgically closed when healthy.
Suggested reading
1. Aper RL, Smeak DD. Clinical evaluation of caudal superficial epigastric axial pattern flap reconstruction of skin defects in 10 dogs (1989-2001). J Am Anim Hosp Assoc 2005;41(3):185-192.
2. Campbell BG. Prepubic urethrostomy and placement of a caudal superficial epigastric flap for treatment of a self-mutilation injury in a serval. J Am Vet Med Assoc 2003;222(5):628-632, 602.
3. Hedlund CS. Surgery of the integumentary system. In: Fossum TW, ed. Small animal surgery. 3rd ed. St. Louis, Mo: Mosby Elsevier, 2007;159-259.
4. Moores A. Axial pattern skin flaps. In: Williams J, Moores A, eds. BSAVA manual of canine and feline wound management and reconstruction. 2nd ed. Gloucester, U.K.: British Small Animal Veterinary Association, 2009;100-143.
5. Pavlectic MM. Atlas of small animal wound management and reconstructive surgery. 3rd ed. Ames, Iowa: Wiley-Blackwell, 2010;357-401.
Advertisement
Related Content
Advertisement


Latest CME


Advertisement
Advertisement
Trending on dvm360
1
Pet ownership and care should not only be for the wealthy
2
Global survey reveals the overlooked role of veterinary professionals
3
Caring for patients in crisis worldwide
4
Understanding the phamacologic principles of transdermal drug delivery
5