
|Articles|July 29, 2009
Miller's knot methodology: figure 3
A step-by-step photo package illustrating application of a Miller's knot for veterinarians.
Advertisement
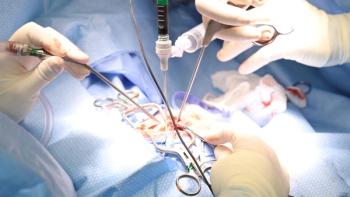
This diagram shows tightening of the Miller's knot as the proximal clamp is “flashed” (slowly opened, allowing the knot to be tightened and then the clamp retightened). Two further ligatures are applied below the distal clamp.
This flashing technique was taught to me by two Mayo-trained surgeons. I introduced and then taught the procedure to veterinary surgery students in 1973 and published the Miller's knot in 1985 and the flashing technique in 1989. The flashing technique allows the shape of the wide flat pedicle, held in a tight clamp, to be pressed into a round pedicle and then compressed by a ligature, while still having the clamp in place. The clamp is then retightened.
This technique, along with the Miller's knot, has use in many other surgeries where a wide pedicle is clamped and requires ligation. These include partial liver-lobe resection, partial pancreatic resection, and large vascular pedicles containing fat such as those associated with ovariohysterectomy, partial omentectomy, splenectomy and partial gastrectomy.
More in this package:
Advertisement
Advertisement
Related Content
Advertisement


Latest CME


Advertisement
Advertisement
Trending on dvm360
1
Tornado (the dog) touches down at the emergency department
2
Q&A with an emergency veterinarian on critical care and common ER misconceptions
3
Every 30 extra minutes under anesthesia raises complication risk in brachycephalic patients, underscoring the importance of peri-anesthetic management
4
When veterinary partnerships work (and when they don’t)
5