
|Articles|November 1, 2009
How to obtain arterial samples for blood gas analysis
Author(s)Katherine Snyder, DVM, DACVIM
Follow these steps to acquire arterial samples to help diagnose acute lung injury or ARDS.
Advertisement
Follow these steps to acquire arterial samples to help diagnose acute lung injury or ARDS.1 Information on interpreting blood gas analysis results is available elsewhere.2
Step 1
Prepare a 3-ml syringe with a 25- or 22-ga needle or a vented arterial blood gas syringe. Make sure the blood gas analyzer and any associated cartridges are available for immediate use.
Step 2
If you use a regular syringe, coat the syringe with sodium heparin, leaving a small amount in the hub of the needle. If you use a special vented arterial blood gas syringe, pull the plunger back to the volume of desired blood.
Step 3
Palpate the pulse in the desired artery. Dorsal metatarsal (pedal) arteries, located on the dorsomedial aspect of the metatarsals, are most commonly used, but femoral arteries or lingual arteries (in anesthetized patients) can also be used.
Step 4
Clip and prepare the area.
Advertisement
Step 5
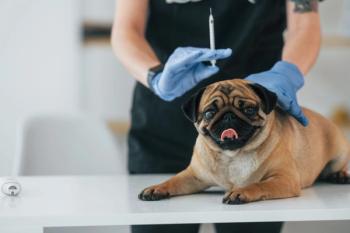
Re-palpate the arterial pulse by using the first two fingers on your nondominant hand. You will not be able to visualize the artery (Figure A).
Figure A. The nondominant hand palpates the dorsal metatarsal artery on a dog's left hindlimb. The opposite hand is holding a vented syringe. The dog has been clipped and prepped for arterial blood collection.
Step 6
Insert the needle through the skin only, allowing the animal time to react to any skin discomfort.
Step 7
Using your palpating fingers as a guide, insert the needle parallel to where you feel the arterial pulse with the needle angled at about 45 degrees.
Step 8
Arterial puncture should result in a flash in the hub of the needle or filling of the syringe with arterial blood. You may need to aspirate with the plunger to obtain a full sample. If you use a vented syringe, the syringe is made to fill with blood until it reaches the volume preset by the plunger.
Step 9
Withdraw the needle, and apply pressure for one to five minutes, and monitor for hematoma formation.
Step 10
Remove any air bubbles (if using a regular syringe), and place a rubber stopper on the end of the needle (Figure B).
Figure B. An arterial blood sample after collection with a rubber stopper providing an airtight seal to promote sample integrity.
Step 11
Run the sample through the analyzer as soon as possible, or place it in an ice water bath if a short delay must occur.
REFERENCES
1. Davis H. Venous and arterial puncture. In: Textbook of veterinary internal medicine. 6th ed. St. Louis, Mo: Elsevier Saunders, 2005;386-388.
2. Haskins SC. Interpretation of blood gas measurements. In: Respiratory diseases in dogs and cats. 1st ed. St. Louis, Mo: Saunders, 2004;181-193.
Advertisement
Related Content


Latest CME


Advertisement
Advertisement
Trending on dvm360
1
Weekly Vet Report: First clinical use of TMJ arthroscopy in dogs, Lyme-lepto combo vaccine approval, & more
2
Veterinary hospice offers cats and clients familiar comforts (Part 1): Familiarize clients with veterinary hospice
3
Survey highlights gaps in canine pruritus management expectations
4
New World screwworm: The flesh-eating parasite returning to the spotlight
5