

|Articles|July 29, 2009
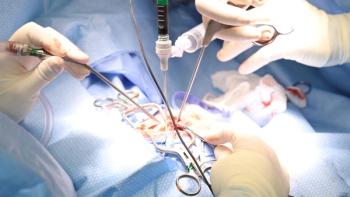
Applying a Miller's knot: step 3
A step-by-step photo package illustrating application of a Miller's knot for veterinarians.
Advertisement
In the third step, the two ends of the knot are pulled tightly as the pedicle is flashed (clamp loosened briefly). As the ends of the cord are tightened, the two “ligatures” remained tight. This remains tight with application of a square knot tied on the opposite side of the model pedicle. This shows why the knot functions effectively.
4. Next, the flashing and tightening is repeated.
5. Each end is then carried around the pedicle in the original direction it was coursing when tightened.
6. The knot is either tied on the back side of the pedicle or the ends are both brought around the pedicle and tied opposite where the leading end was brought under two lines. When the ends are continued around to the front side of the pedicle and tied, this allows for better visualization of the knot being tied.
For added security the ends of the Miller’s knot are brought around the pedicle again and tied tightly, and this is repeated one more time. When completed, there have been at least four encircling ligatures that have been placed - the first two associated with the pass-under portion of the knot, the third and fourth made with square knots placed to provide ligature completion.
Following the last ligation, the distal most clamp is then removed. A tissue bumper of 2 to 4 mm should be present above (beyond) the ligations. The ligated pedicle is then inspected for any leakages. If these are seen, the pedicle clamp is reapplied and another complete ligation is completed.
Advertisement
The pedicle is then re-inspected. If no leaks of air or blood are noted, then the entire pedicle is submerged with irrigation fluid to look for bubbles and red (blood) streams. If none is seen, the irrigant fluid is removed, a chest tube placed and the thoracic cavity closed routinely.
More in this package:
Advertisement
Related Content
Advertisement


Latest CME


Advertisement
Advertisement