

|Articles|May 1, 2005
Dental Corner: How to perform a nonsurgical extraction
Author(s)Daniel T. Carmichael, DVM, DAVDC
A dental extraction should be considered an end-stage procedure. When teeth are salvageable, we can go to great lengths to avoid extraction. Unfortunately, in many cases extraction is advisable and necessary.
Advertisement
A dental extraction should be considered an end-stage procedure. When teeth are salvageable, we can go to great lengths to avoid extraction. Unfortunately, in many cases extraction is advisable and necessary. Extraction is indicated for teeth with end-stage periodontal disease, fractured teeth with an exposed pulp (when endodontic treatment is not possible), retained deciduous teeth, teeth with feline odontoclastic resorptive lesions, crowded or malpositioned teeth, and other select cases.
Nonsurgical, or simple, extraction refers to the extraction of single-rooted teeth including the incisors, first premolars, deciduous canines, and mandibular third molars. The extraction of canine or multirooted teeth, which is considered a surgical extraction, will be discussed in a future article. A nonsurgical extraction may become a surgical extraction if complications such as root fracture occur. To avoid misunderstandings, always get a client's consent before extracting.
KEY CONCEPTS TO KEEP IN MIND
The goal of a dental extraction is to remove the tooth, including the root, from the alveolus. The root is attached to the alveolus by hundreds of thousands of tiny fibers collectively called the periodontal ligament. A dental extraction is not possible until these fibers have been severed. The periodontal ligament can withstand sudden, sharp, and jerky forces, and it is because of this that teeth can absorb and survive the forces placed on them by mastication and other dental functions. However, the periodontal ligament cannot withstand prolonged, steady stretching forces. So the key to dental extraction is to create a gentle and sustained stretching force on the periodontal ligament that will cause it to fatigue and ultimately sever.
A dental elevator is used to stretch the periodontal ligament. Wiggs winged elevators are an excellent choice for most extractions (Figures 1A & 1B). The thin, sharp working end is not intended for severing the ligament but rather helps you work the elevator into a position where leverage or rotational force can generate micromovement of the tooth and stretch the periodontal ligament.
NONSURGICAL EXTRACTION TECHNIQUE
Step 1: Provide analgesia and obtain pretreatment radiographs
A dental extraction is a painful procedure, and appropriate measures should be taken to provide analgesia for the patient. Administer an analgesic preoperatively and perform regional nerve blocks. Antibiotic therapy is indicated in patients with concurrent periodontal or endodontal infection. Antibiotics are ideally administered for several days before an extraction if the periodontium is infected to improve the health and healing characteristics of the gingival tissues.
Advertisement
Radiography is indicated before all dental extractions. Radiography alerts you to unforeseen complications such as root dilaceration (a curve in the root), root resorption, ankylosis, and extra roots (e.g. a third root is occasionally observed in the maxillary third premolar). Pretreatment radiographs also document the pathology that dictated the extraction.
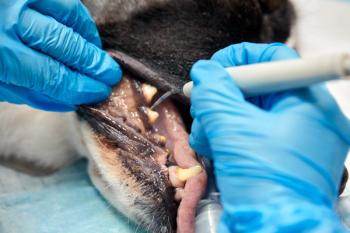
Step 2: Incise the gingival epithelial attachment
The next step is incising the gingival attachment. This can be performed with a No. 15 scalpel blade. Incise the gingival attachment 360 degrees around the tooth, using the gingival sulcus as a landmark (Figure 2).
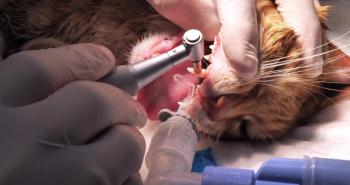
Step 3: Insert a dental elevator
Next, insert a dental elevator into the gingival sulcus to engage the tooth. Insert the tip, or blade, of the elevator between the tooth and the alveolar crest, slightly angling it toward the tooth. By applying gentle pressure apically as you also rotate the elevator a few degrees in a side-to-side rocking motion, you establish a purchase on the tooth so levering forces can be applied (Figure 3). From this point, rotate the elevator in a motion similar to turning a door handle (Figure 4). Hold the elevator in this rotated position for 10 to 15 seconds to allow the periodontal ligament fibers to stretch, fatigue, and separate, creating micromovement of the tooth. Next, find another purchase point and repeat the procedure, holding the tooth in the distracted position for 10 to 15 seconds. Repeat this procedure several times to stretch the periodontal fibers to the point of fatigue, at which time the tooth will loosen. Do not use the extraction forceps until the elevator has produced marked tooth mobility.
When you perform an extraction, patience cannot be overemphasized. The extra seconds spent holding the tooth in the slightly distracted position will prevent the many minutes needed to retrieve retained roots, not to mention the added trauma to the patient associated with additional bone removal and surgical intervention.
Step 4: Extract the tooth
When the tooth is markedly loose, use appropriately sized dental extraction forceps to grasp the crown near the gingival margin. Gently rotate the tooth along its long axis until it can be removed from the alveolus (Figure 5). Do not use excessive force with the extraction forceps when removing a tooth that has not been appropriately loosened with the elevator. Complications could include root fracture or even fracture of the alveolus, mandible, or maxilla. Digitally palpate the apex of the root after extraction (Figure 6). It should be round and smooth. If it is not, a root fracture has probably occurred, and radiography is indicated to plan for root tip retrieval.
Once the tooth has been removed from the alveolus, flush out any calculus or foreign debris. If periodontal disease has left parts of the alveolus necrotic, curet these areas. Finally, apply digital pressure (squeeze the alveolus) to return the alveolar bone plates to their normal anatomical position. The alveolar squeeze will aid in clot retention, which is important for healing. All extraction sites larger than 2 mm should be sutured without tension. If such a wound is left open to heal by second intention, food and debris can enter it, causing delayed healing and increased patient discomfort. Suturing can also ameliorate postoperative hemorrhage. In some cases, a gingival flap may need to be created to close the defect without tension.1 Suture material should be fine and rapidly absorbable; 3-0 and 4-0 chromic gut are good choices.
Step 5: Provide aftercare
In addition to providing perioperative analgesics and nerve blocks, you should discharge patients with an appropriate course of analgesic therapy. Nonsteroidal anti-inflammatory drugs, alone or in combination with narcotics, are appropriate choices if not contraindicated by the patient's medical history. Instruct the owners to offer the patients only soft food and to avoid giving the patient hard chew toys and treats for five to seven days after the extraction.
The information and photographs for "Dental Corner" were provided by Daniel T. Carmichael, DVM, DAVDC, The Center For Specialized Veterinary Care, 609-5 Cantiague Rock Road, Westbury, NY 11590.
REFERENCE
1. Bellows J. Small animal dental equipment, materials and techniques. In: Oral surgical equipment, material, and techniques. Ames, Iowa: Blackwell, 2004;297–321.
SUGGESTED READING
1. Colmery B. Oral surgery: dental extractions. In: Carmichael DT, ed. Recent advances in small animal dentistry. Ithaca, NY: International Veterinary Information Service (
2. Holmstrom SE, Frost P, Eisner ER. Exodontics. In: Veterinary dental techniques for the small animal practitioner. 2nd ed. Philadelphia, Pa: WB Saunders Co, 1998;215–254.
Advertisement
Related Content
Advertisement


Latest CME


Advertisement
Advertisement
Trending on dvm360
1
AAVSB tapped to develop VPA licensing examination
2
In the Beam: Veterinary Laser Therapy
3
Creatine for veterinary professionals (Part 1): What it is, how it works, and why you should care
4
FDA launches pilot to boost US manufacturing of animal drugs
5