

|Articles|May 1, 2011
Conventional root canal therapy for non-vital teeth (Proceedings)
Author(s)Peter Emily, DDS, DAVDC (Honorary)
Pulpal functions are 1) formative, 2) nutritive, 3) sensory, and 4) defensive.
Advertisement
Pulpal function
Pulpal functions are 1) formative, 2) nutritive, 3) sensory, and 4) defensive.
1. Formative: pulpal function is formative in that it produces dentin. The development of the pulp is a gradual process that varies with the individual tooth. Development of the pulp takes place after the development of the dental organ, from mesenchymal cells, known as the dental papilla, directly under the dental organ. A distinct basement membrane divides the cellular elements of the dental organ and the dental papilla from each other, and the concentration of cells in the dental papilla stands out clearly from the surrounding oral tissues.
Dentin and pulp share an integral relationship with the odontoblastic processes. When a lesion invades the dentin, the odontoblastic processes and the pulp are involved.
As maturation occurs additional layers of dentin are added. Each dental tubule containing a vital odontoblastic. The dentinal tubule tapers to a cone like shape to the dentinoenamel/dentinocementum junction. The dentinal tubules and odontoblastic process are less voluminous at the periphery of the tooth tapering to an almost closed structure at the cemental wall. The cellular, cytoplasm content of the dentinal tubules is significant in all endodontic treatment. Open dentinal tubules can lead to pulpal pathology.
2. Normal healthy pulpal tissues continue dentinal deposition at a slow rate throughout life. This is referred to as "calcifying down" of the pulp chamber. Pulpal pathology decreases dentinal deposition. Dentin deposition ceases with tooth mortality
3.Nutritive: the pulp provides nutrient to the surrounding tissues during development. After development dentin metabolism continues via the odontoblastic processes. The narrow pulp canals of older animals continue to remain vital with pulpal circulation intact and functional.
4. Sensory: the sensory function of the pulp is response to pain. This is accomplished through the nervous intervention via the apical foremen. Nerve bundles enter the pulp splitting into finer bundles then into unmylinated fibers that enter the odontoblastic layer. Pulpal nerves seem to remain unchanged in older animals. After pulpal necrosis of the coronal pulp with apical inflammation, nerves may still persist in the apical area.
5. Defensive: pulpal response to injury is inflammation. Inflammation produces a chemo tactic response that slows the destructive action to the pulp. Continual irritation will result in pulpal death in spite of a strong response to the irritation from a well-vascularized pulp.
Vessels
The dental pulp is a blood rich organ. The numerous vessels that pass through the apical foremen are distributed throughout the pulp. Most vessels are thinned walled with large lumen. When circulation is cut off, as seen with traumatic severance of vascular supply to the pulp, or periodontal involvement to the apical area, pulpal necrosis result form lack of nutrients to the pulp. It has been demonstrated that the pulp contains lymph vessels through experiments with calcium hydroxide and its rapid uptake into the pulp during pulp capping and Pulpotomy procedures.
Pupal pathology
A basic understanding of pulpal disease is needed to establish a need or lack of for endodontic therapy, and to predict the results of treatment.
Age considerations
Aging pulp tissue undergoes reduction of tissue volume, cellular components, nervous tissue, odontoblasts, and vascular supply. With the closing down of pulpal dimensions through continual calcification by odontoblasts, and reduction of pulpal components the pulpal response to injury is impaired.
Pulpal insult can set up the inflammatory process through the dentinal tubules, by direct dentinal insult of topical irritants, through Anachoresis, localization of blood-born bacteria in hyperemic pulp, or as a result of periodontal disease in combination perio. /endo. Lesions.
Pulpal inflammation is the result of trauma, pulpal exposure as the result of coronal fracture, bacteria, pulpal necrosis with abcessation, iatrogenic factors, or idiopathic in origin, such as internal resorption from unknown factors.
Conventional root canal procedure
Equipment
• High-speed hand-piece (low-speed will suffice if' high speed is not available)
• Burs: round-head size 2-4', or pear-shaped size 330) or 331
Advertisement
• Barbed broaches: -30 mm and 45-50 mm lengths
• Root canal files: K-files and Hedstrom files in 30 mm 55-60 mm lengths. Sizes 15-80:and 90-140.
• Chelating agent: this is a paste, which aids the debridement of the canal. Softens the dentine and lubricates the canal (a.k.a. R.C. Prep)
• Flushing solutions: sodium hypochlorite, (bleach in a 3ml syringe)
• Locking dental pliers or forceps (for placing paper points and gutta percha)
• Paper points: assorted sizes in 30 and 45 mm lengths.
• Gutta percha (GP): assorted sizes 30 Lengths
• Root canal filling cement: ex. Zinc oxide (powder) and eugenol or suitable calcium hydroxide base cement such as Sealapex (a slow-setting calcium hydroxide paste)
• Mixing slab
• Mixing spatula
• Spiral paste fillers: assorted sizes in 45-60 mm lengths.
• Low-speed contra-angle hand piece.
• Root canal explorer.
• Endodontic plugger-spreader
• Scalpel blade
• Plastic filling instrument (e.g., Beaver tail at one end and burnisher at the other)
• Radiographic Equipment
• Calcium hydroxide hard-setting cement (if using zinc oxide and eugenol cement and composite
• Ballpoint applicator
• Final filling material (composite. glass-ionomer or amalgam) with the recommended tooth surface-preparing agents
• Finishing bur (egg size 7901)
• Finishing burs, disks, and abrasive rubber wheels cups or stones: or fine grade sanding discs.
Procedure
The objectives of' root canal treatment are a clean canal, an apical seal, and sealed access.
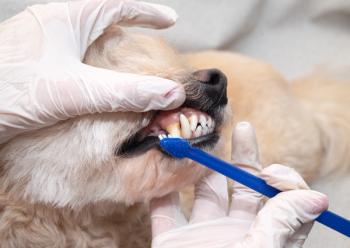
1. The tooth is radiographed to ensure there are no complicating factors, which may favor a different procedure. The radiograph also helps to locate the apex exactly. The mouth is cleaned with Chlorhexidine or povidone-iodine paying particular attention to the affected tooth.
2. If there is no fracture of the crown through which the pulp chamber can be entered and the apex reached. An access is made through the crown into the pulp chamber. The access hole is made as small as possible, to minimize any further weakening of an already weakened tooth. However, it must be large enough to accommodate the file shafts otherwise a false sensation of reaching the apical stop may be encountered due to a file shaft becoming jammed in the access hole.
a. Access: the access cavity preparation is made to provide access to the root canal to the apex. There is usually a palpable bony prominence over the root of a tooth. Aiding to identification of the apex. A round (size 1 or 2) or pear-shaped (size 330 or 331) bur is used to make the access. When drilling into enamel. The initial 0.5 mm depth is cut at 90- to the surface: the drill is then angled towards the apex. This reduces the risks of slipping when starting the cut. The hole is drilled directly over the pulp chamber as follows.
b. For canine teeth where the entire crown is present, the access is placed on the lateral\rostral surface, 2 mm coronal to the gingival margin. The access to the pulp chamber is begun by starting the initial entrance at 90' to the enamel surface, then turning to point the bur at the apex and the pulp chamber (which runs down the center of the tooth). The apex of a dog's canine tooth lies apical to the rostral root of the second premolar.
c. Incisor access is made on the rostral surface, halfway down the crown. Incisors are small teeth with small pulp chambers, so it may be necessary to use a smaller bur (round, size 1).
d. Incisor access can be the lingual or palatal aspect of the incisor surface at the level of the Cingulum. .
e. For multi-rooted teeth, access holes are made directly over the root canal of each root. Occasionally one huge access hole can be making in severely compromised upper fourth premolars placed in the lateral wall of the tooth. From which all the root canals can be reached with flexible files. This may weaken the crown and is not the preferred method of accessing the pulp chambers of the upper fourth premolar and the lower first molar.
f. The palatal root of the upper fourth premolar is small and tends to flare out medially. It is easy to perforate the root furcation if the access preparation is directed laterally. Direct the bur towards the apex in a slightly medial direction. The anterior roots diverge apically in this tooth. Stop drilling as soon as the pulp chamber is reached. Gently explore with a 25 mm size 10 K-file or a root canal.
g. The explorer will find the canal. Old canals are often difficult to find or are completely occluded. If it cannot be found, the palatal root may be amputated and extracted or atomized with a small round bur. If the exposed end of the communicating pulp chamber, between the amputated palatal root and the rostral root, can be found, it is sealed with a filling material in the same way as the access is sealed, at the end of' the procedure.
h. A sharp root canal explorer is inserted through the access hole or holes to locate the canal entrance and direction. If the canal has not been entered, the direction of' the access hole is checked and adjusted to provide access to the canal. A little force on the explorer may push it through a thin remnant of dentine, into the pulp chamber.
3. A 25 mm K-file, size 10 or 15, is inserted into the pulp chamber through the access hole. It is worked in and out against the sides of' the access hole to smooth the passage between the access and pulp chamber. With larger pulp chambers, larger files may be used. Always start with a small size and gradually work up to the larger sizes (size 15 then 20, then 25, then 30, and so on).
4. If vital tissue is present, a barbed broach is inserted into the pulp chamber as far as it will go without force. It is rotated many times to twist the pulp on to it. It is carefully withdrawn, bringing any intact pulp with it. The procedure is repeated many times until the broach comes out clean. If the pulp is necrotic, the pulp chamber will contain organized remains; there will be nothing with any form to engage the barbed broach.
5. Root canal therapy for canine teeth is begun by inserting a 55-60 mm Hedstrom file, size 15, lightly coated with a chelating agent or detergent into the canal worked back and forth until the approximate apex is reached. This apex often is felt as a dull thud. The rubber depth marker on the shaft of the file is moved along the file to touch the access, while the tip of the file is in contact with the apex. A radiograph is taken with the file in place to verify the position of the tip of the file. If it is at the apex, it is withdrawn and the markers on the other files are moved to mark the same length. In this way, the exact length of the canal is known. The rubber markers may be made by cutting sections of rubber band and threading one on to each file. Increasingly larger files, 20, 25, 30 etc. are inserted and worked in the canal, ending with the file at the verified apex while removing the pulpal contents.
a. The files are held between the index finger and the thumb; a gentle lateral pressure is exerted on the file with the third finger to guide the file onto the walls of the canal, so that all the walls of the canal are filed clean: the fourth finger acts as a fulcrum, resting on an adjacent tooth. Hedstrom files should not be rotated while in the canal as their tips fracture easily. Files with bent tips should be discarded to avoid their fracture in the canal. The smaller sizes are more fragile than the larger ones. The size of file inserted and worked in the canal is gradually increased until a size too large to reach the apex is used. (e.g. size 40) The file of the next size down (e.g. size 35) is reinserted into the canal and worked to the apex. The size of this file denotes the diameter of the apex (e.g. 0.35 mm diameter).
b.Files of increasing sizes are used to clean the walls of the canal, without reaching the apex. Filing is complete when clean white filings come out of the canal on the file.
6. The canal is flushed with .a sodium hypochlorite solution to remove any remaining debris and disinfect the canal. Recent studies have shown that sodium hypochlorite may be the final flushing solution of choice, although many operators prefer to use sodium hypochlorite then hydrogen peroxide then sterile saline, repeating this sequence several times and ending with a final flush of sterile saline. The animal's tissues (i.e. gingiva, mucosa and lips) must be protected from these solutions.
7. The canal is dried. Oil-free pressurized air is directed obliquely over the access. Air should not be directed straight down the canal, as this may force air emboli into the periradicular tissues. Final, thorough drying of the canal is achieved by inserting sterile paper points of an appropriate size and length into the canal, held in locking forceps. Larger sizes are used to soak up the bulk of the liquid, and then a size, which will enter the apex, is used to dry the apex. Many paper points are used until two or three successively are brought out dry.
8. The root canal filling cement is mixed on a mixing pad or slab to a creamy consistency (it doesn't quite run off the pad). Zinc oxide and eugenol (ZnOE) is antibacterial; it takes several hours to set and so is easier to use initially. Slow-setting calcium hydroxide cement (e.g. Sealapex) is also antibacterial and will stimulate the production of reparative dentine around the apex, possibly producing a better apical seal and apexification of open apices; it sets in 30-40 minutes in a humid environment (i.e. inside the root canal), but will remain liquid on the mixing pad for several hours.
a. The spiral paste filler of an appropriate size and length is inserted into the low-speed contra-angle hand piece. It is loaded with cement. By rotating counterclockwise in the cement. The loaded spiral is inserted into the canal and rotated clockwise at 1000-2000 rpm. This spins the cement off the spiral and on to the canal walls. It is slowly withdrawn while spinning, reloaded and reinserted. This process is repeated until cement exudes from the top of the canal. The rotating of the spiral tends to drive the cement apically, forcing any air bubbles coronally. Injecting the cement into the canal is not successful in a canal whose apex is less than size 60 (i.e. 0.6 mm diameter). As air bubbles tend to be locked in the apex, which prevents the apex from being sealed. Some authors obturate large canals; with apices greater than size 60, with cement fill only injecting cement as the needle is slowly withdrawn. This technique has not proven successful. Often due to an incomplete apical seal with cement alone.
9. A gutta percha (GP) point of the same size as the apex (e.g. size 35) is coated in cement and inserted into the cement-filled canal. It is pushed to the end of the canal and engaged in the apex, thoroughly sealing the apex (rather like a cork sealing the neck of a wine bottle). Accurately sized GP of a length suitable for canine root canals (i.e. 55-60 mm long) hopefully will soon be available, but until then, there are methods of forcing the shorter GP into the apex to affect a seal. Either melt two appropriately sized together end to end, preserving the measured diameter end (i.e. the 0.35 mm end); or melt the correctly sized (e.g. size 35) GP onto the end of a veterinary Length GP, (at present only available in size 'medium'); or push the 30mm into the apex with a plugger. Further GP loaded with cement is pushed into the canal with the aid of pluggers. An appropriate diameter spreader is inserted into the canal and forced in next to the master point GP. This pushes the GP firmly against the canal walls; squeezing cement into the dentinal canals and creating a space for the insertion of cement coated GP. This process is repeated until there is no more space for the spreader. GP and cement protrude from the access. The excess GP is cut level with the access with a scalpel blade or the heated beaver-tail end of a plastic filling instrument (PFI). The GP is pushed further into the canal with the rounded end of a PFI.
10. A radiograph is taken to ensure that the apex is sealed to the radiographically confirmed apex with no voids present, especially apical to the gutta percha apex. If it is not, the whole procedure should be repeated. Any debris left in the apex will continue to service the pulpal pathology. Unsealed dentinal tubules rapidly reintroduce bacteria into the canal; an incomplete apical seal will allow bacterial proliferation into the periapical tissues.
11. A small undercut is made in the dentine of the access hole and the excess GP and cement burred away from the cavity walls using a pear-shaped bur (size 330 or 331). If the access hole is already at an angle, an undercut is only necessary on the side opposite the undercut to produce a retentive cavity for the restorative material. The cavity preparation debris is flushed out and the access hole dried with oil-free pressurized air. If ZnOE was used as the canal filling cement and composite is chosen for the final filling, an 1 mm layer of hard-setting calcium hydroxide cement is placed over the ZnOE to separate the ZnOE and the composite. Since ZnOE prevents composite from setting.
12. If a calcium hydroxide sealing cement is used, the undercut is carefully burred to remove any excess calcium hydroxide cement form the cavity walls and the debris flushed away.
13. The final filling material is mixed, having prepared the tooth surfaces according to the manufacturer's instructions. It is packed into the prepared site, avoiding air bubbles and ensuring a perfect seal. Once set. The excess is removed and filling smoothed with a finishing bur or sandpaper disks and polished with rubber abrasives and if necessary, prophy paste.
Newsletter
From exam room tips to practice management insights, get trusted veterinary news delivered straight to your inbox—subscribe to dvm360.
Advertisement
Related Content
Advertisement

Advertisement
Advertisement
Trending on dvm360
1
Thailand makes history with nation's first cat pacemaker surgery
2
FDA conditionally approves topical drug for cattle to prevent and treat New World screwworm
3
Cynthia M. Otto reports research showing the benefits of a trained head dunk to prevent heat stroke in dogs
4
Understanding oncology diagnostics and therapeutics
5
