

|Articles|April 6, 2019
15 tips for nailing derm diagnostics in veterinary patients
Author(s)Karen A. Moriello, DVM, DACVD
Benefit from these dermatology lessons for scoping out conditions in dogs and cats, many of which were learned after difficult or awkward moments.
Advertisement
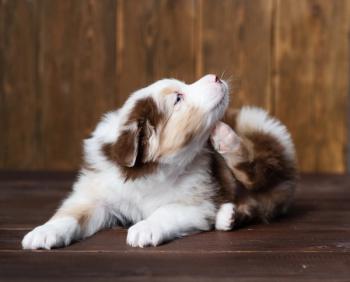
Frenchies are known to have a derm issue or two. Check out these derm diagnostic tips and tools that will be a little more helpful than a magnifying glass. (adobestock/Willie Cole)Two of my favorite dermatology practice mantras:
• More is missed for not looking than not knowing.
• Without diagnostics you are just guessing.
Yes, the history and physical examination are important when working up dermatology patients, but at some point diagnostics are indicated. Here are my suggestions for spotting skin conditions in your patients and talking with clients about the process.
Tip #1. Include the cost of core diagnostics in your examination fee.
In our practice we consider the “derm TPR” to include skin cytology, ear cytology, trichogram examination, skin scraping and Wood's lamp examination. Lumping together these point-of-care (POC) tests is a huge time saver for us because it means we don't have to stop and haggle over performing each one. (This tip stems from an embarrassing moment after a failed haggle over a skin scraping. Now I'm the veterinarian who can document, “Demodex mites were not found at today's visit.”)
Tip #2. Have a “derm diagnostics kit” ready.
To save time and increase efficiency, organize everything you need for the derm TPR and a few other POC tests in a simple plastic box. Be sure to place glass slides frosted side up so you always know which side the samples are on when staining and examining them (Figure 1).
Figure 1. A derm diagnostics kit. (Image courtesy of Dr. Karen Moriello)
Tip #3. Don't charge your clients for “nothing.”
It is really awkward when a student or technician reports to the client that “there was nothing on the slide.” Of course, there really may have been “nothing” on the slide because the sample was acellular. What happens more commonly is that mites, yeast or bacteria are not found and someone reports, “I didn't see anything.”
The first tip with “nothing” findings is what you say before you do a POC test. I tell clients this: “I believe that one should never conduct a test unless they have a specific question in mind. For this test, that question is ______.” When results are in, I remind clients what the question was and then share and explain the results. For example, “Demodex mites were not found, which is good because ….”
Advertisement
This is especially helpful for reporting skin biopsy findings to clients when there is no definitive diagnosis. Tell clients what the test rules out (e.g. cancer, infections), and don't forget that just because this is a skin disease does not mean the client isn't anxious. The comment “And that's reassuring because …” is appreciated.
Tip #4. Ditch the scalpel blade for a skin spatula.
Skin scraping spatulas are essentially weighing spatulas used in chemistry. They are professional looking, blunt edged, easily disinfected and very cost-effective compared with using a new scalpel blade for every dermatology patient. Not using scalpel blades in the examination room also minimizes the risk of injury and exposure to human blood if there is an accident. Spatulas can be used easily in a traditional scraping to collect skin cytology, nail bed cytology, and surface debris without risk of injuring the animal or user.
Tip #5. Do hair trichograms.
These have been found to be just as diagnostic as skin scrapings for finding Demodex species mites. Hold a mosquito forceps at 90 degrees to the base of a small group of hairs, pluck and transfer the hairs to a glass slide prepared with a drop of mineral oil, and place a coverslip on top. Look for mites at the base of the hairs. This technique can also be used to find other types of mites (e.g. Cheyletiella species). You can also look at hair shafts for evidence of dermatophyte infections.
Tip #6. Use coverslips on skin scrapings and trichogram samples, and let samples “sit” before examining.
This trick is a real time saver when looking for mites. The weight of the coverslip pushes the debris to the edges of the slide. Instead of examining the slide in a zig-zag pattern, start at the edges and use 10x magnification. Be sure to turn the condenser down to increase contrast. Mites are often moving, and the motion may allow your peripheral vision to spot them sooner.
Tip #7. Hate sticky tape cytology samples? Try these modifications.
Collect samples using good-quality, wide, clear tape. Holding the tape by one end only, lay it over the target site, press firmly, then peel off and stain the tape. Do not make multiple impressions with a single piece of tape or the sample will be too cellular. For better staining, don't adhere the tape to a glass slide. Use a clothes pin to hold the tape while staining it, and skip the fixative step. Be sure to let the tape dry thoroughly. Put a drop of immersion oil on a glass microscope slide and, starting at the center of the tape specimen, gently press the sample onto the surface of the slide. Examine the slide with 4x and 10x magnification to find a good site and then view it with oil immersion.
Tip #8. It's really more of a squeeze than an impression smear.
To improve the cellularity of glass impression smears, grasp a fold of skin with one hand as if you were going to do a subcutaneous injection, lift the thumb on that hand, place the frosted side of a glass microscope slide on the target site, replace your thumb and then gently squeeze. If you have done it correctly, you will see a thumbprint on the slide. (If you want to sample another area on the patient, use another site on the slide. Don't “double dip” or the sample will be too thick for good visualization.)
Tip #9. Lift those crusts.
Bacteria-, yeast- and dermatophyte-infected hairs are often found under crusts. Use a skin scraping spatula to gently lift the edges of an epidermal crust and sample beneath it for cytology or culture. Look under crusts for glowing hairs. (See Tip #15.)
Tip #10. Make these changes when using Diff-Quik to improve quality and minimize artifacts.
Keep stains covered at all times to prevent dust and debris from getting into the stain solution. Replace stains once a week. If you use glass staining jars, be sure to have two sets and wash the used one in a dishwasher to remove stain debris. Use distilled rather than tap water for the final step to minimize streaking on the slide. Change the water at least once a day. When moving from one stain to the next, be sure to blot excess stain gently from the slide onto an absorbent towel. This minimizes the “oil slick” that floats on the top of the #3 (blue) stain.
Tip #11. Don't examine wet slides or wet tape preps.
Everyone is busy, but this is important. There is no such thing as an emergency skin cytology. Skin, ear and tape cytology involve the use of immersion oil. When oil and water mix, samples are inferior, so make sure your slide or tape is dry before examining. Invest in a small handheld fan if necessary.
Tip #12. Stop heat-fixing slides.
Several studies have shown that heat-fixing is not necessary. Doing so causes artifacts and destroys cellular structures.
Tip #13. Do use both Diff-Quik stains.
A misdiagnosis will not save time. Get all the information you can out of your slide. If you don't stain with “red” you might just miss something important such as eosinophils.
Tip #14. Don't ignore Malassezia in itchy pets.
Yes, Malassezia species is part of the normal skin biome, but the bottom line is that if the pet is itchy, it's an important finding. If you are not finding Malassezia on a slide, look at skin cells as they tend to be found on cells. Be aware of the morphology of Malassezia: They can vary from classic peanut-shaped to round.
Tip #15. Wood's lamp: buy one and be done.
The Wood's lamp is not a test; it's a tool just like your microscope that is used to find glowing hairs for direct examination, culture or both. It is now known that apple-green fluorescence is an inherent property of Microsporum canis, and studies on spontaneous disease have shown this color to be a positive finding in 91% of patients. (The 30% to 50% figure came from retrospective studies from diagnostic laboratories in the 1950s and 1960s.)
The lamp does not need to warm up. Use one that plugs in and has built-in magnification. Hold the lamp close to the skin (2-4 cm) and proceed slowly with the exam starting at the head. Only hair shafts glow, not crusts. Lift crusts to look for glowing hairs. I use Burton UV light 365 nm model UV 502.
Dr. Karen Moriello is a clinical professor of dermatology at the Department of Medical Sciences, School of Veterinary Medicine, University of Wisconsin.
Advertisement
Related Content
Advertisement


Latest CME


Advertisement
Advertisement
Trending on dvm360
1
Every 30 extra minutes under anesthesia raises complication risk in brachycephalic patients, underscoring the importance of peri-anesthetic management
2
FDA issues emergency use authorization for ivermectin solution to prevent screwworm in horses
3
From the CVO: I’m off the clock
4
Paws and profits: VetEvolve names first chief veterinary officer, NVA appoints two board members, and more updates
5