

|Articles|September 23, 2013
Questions from the dental trenches: Creating a streamlined exam
From creating a good digital radiography template to making sure all pathology is detected, Dr. Beckman has the answers you need.
Advertisement
This article is the conclusion of a three-part series in which I’m answering questions I commonly receive at the end of lectures on veterinary dentistry. In the first two parts, I discussed the practical side of dentistry and focused on dental FAQs about anesthesia, nerve blocks and tooth extractions. Here, I concentrate on how to efficiently obtain and interpret intraoral radiographs, clean and polish teeth and conduct a thorough oral exam, and identify problems.
Q. When taking digital radiographs, how can I get them all to appear on the screen in a consistent order?
Figure 1: An example of a digital imaging software template. (All photos courtesy Dr. Brett Beckman.)
A. Templates within the digital software need to be created to accommodate different-sized patients. You can create these templates or have the company representative create them for you under your direction. Orientation options for each spot include landscape or portrait and right or left. Portrait orientation is reserved for the incisors. All additional views use landscape orientation. Each spot represents a certain area in the patient’s mouth and progresses in the order the radiographs are taken (Figure 1).
If you use a No. 2 digital sensor, small dogs and cats normally require 10 views to complete a whole mouth series that includes all teeth. Therefore, a template is created in the software to correspond to those views. A medium to large dog requires 15 to 16 views (some patients require two maxillary incisor views to get both the right and left sides). A large dog with a dolichocephalic skull conformation or a very large dog will take 19 to 20 views. If you use a size 4 phosphor plate or film, a large dog generally can be imaged with 10 views. Occasionally 15 views are required.
Q. What is the most efficient way to progress from induction to performing necessary therapy in our patients?
A. Efficiency is extremely important in dentistry, so make preparations accordingly to minimize time spent from induction to therapy. Developing a protocol and maintaining it with every patient is the key. The following protocol is what we recommend.
Induction takes place in sternal recumbency, an ideal position for initiation of the full mouth radiographic series. Secure the endotracheal tube behind the ears to allow the greatest access to all arcades. Make sure the cuff is inflated. Place a towel beneath the patient’s head to align the palate with the horizontal plane (Figure 2).
Figure 2: Immediately after induction, the patient remains in sternal recumbency with a towel placed under its chin to orient the palate horizontally.
Meanwhile, the anesthesia technician should ensure the patient is at a deep enough anesthetic plane to allow for intraoral sensor placement while connecting all monitoring and warming devices. All maxillary teeth can be imaged from this position. This also standardizes positioning to allow for the use of predetermined tube head angles and positions, eliminating confusing bisecting angle calculations that have been taught in the past (Figure 3).
Figure 3: The positioning guide shown here greatly simplifies the confusing bisecting angle dilemma by using predetermined angles and tube head positions to complete radiographs quickly and predictably (see
Advertisement
Starting at the last molar in the right maxilla, the dental technician obtains radiographs to correspond with the numbering sequence and proper position in the template in the digital imaging software as described in the answer above. The progression moves from this position to finish at the last molar on the left maxilla. Then place the patient in dorsal recumbency with a towel under its neck to orient the mandibular arcades horizontally (Figure 4). Starting with last molar of the left mandible, the technician can easily complete both mandibular arcades in this one position, using predetermined angles and tube head position.
Figure 4: A patient in dorsal recumbency, ready for imaging the mandibular arcades.
With templates set up beforehand based on patient size and numbered in the sequence just described, the complete image set can be viewed exactly as it appears in the patient.
With a nicely organized full mouth series, begin viewing the images and recording the findings in the dental chart. Meanwhile the dental technician cleans and polishes the patient’s teeth. Once you have concluded a tentative treatment plan based on the radiographs, the technician suspends cleaning and polishing temporarily so that you can perform a thorough oral examination with periodontal probing and combine the gross findings with that of the radiographs to create the treatment plan. The plan is provided to the receptionist for generation while another staff member contacts the client. Explain the diagnosis and describe treatment to the client. Meanwhile the technician proceeds with cleaning. The receptionist then relays the estimate to the client. Once confirmation is obtained to proceed, administer nerve blocks. The technician completes cleaning and polishing, and you can then begin therapy. Your goal from induction to the beginning of treatment should be 30 minutes.
Q. Should we set our fees based on the stage of periodontal disease?
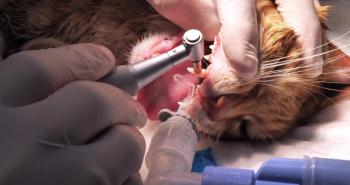
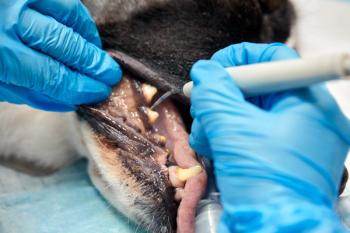
A. The stage of periodontal disease can only be determined on a tooth-by-tooth basis. Many patients have all four stages existing concurrently. Furthermore, the stage of periodontal disease for any given tooth cannot be determined without an accurate evaluation of attachment loss. This can only be determined after dental radiography and probing, which is done under general anesthesia (Figures 5A and 5B). Not only is basing fees on periodontal staging impossible, it only serves to confuse staff and clients.
Figure 5A: What stage of periodontal disease is represented here? Minimal changes are evident in this region in the awake examination.
Figure 5B: The stage of periodontal disease cannot be determined until intraoral probing and particularly dental radiography are completed. This region demonstrates stage 4 periodontal disease affecting the left mandibular first and second molars.
An oral diagnostic evaluation estimate should be standardized for all patients with periodontal disease based on full mouth radiography, preoperative diagnostics, anesthesia, monitoring, cleaning and polishing. Educate clients with pictures and radiographs of expected pathology and advise them that they should expect that such pathology exists in their pets unless the diagnostic evaluation proves otherwise. Further instructions include the need to contact the clients once the diagnostic evaluation is completed to discuss the treatment plan and to update the estimate accordingly.
The staff should stress to clients that treatment beyond cleaning is very common and should be expected. This is enforced at the initial consultation with pictures of the oral cavity of other patients that look normal or have minor pathology but have profound radiographic bone destruction (Figures 5A and 5B). These are common and easy to archive, so keep examples of these images and radiographs readily available.
Q. Aside from periodontal disease, what other common oral conditions should we be looking for?
A. One commonly missed abnormality is missing teeth. Be sure to fully evaluate each patient and confirm that a complete arcade is present. Missing teeth may not truly be missing but rather unerupted in the mandibular or maxillary bone. Unerupted teeth have a strong tendency to develop cysts called dentigerous cysts that expand to destroy bone and compromise adjacent teeth (Figure 6).
Figure 6: A dentigerous cyst on the left mandible of a 3-year-old mixed-breed dog.
Figure 7: Tooth resorption on the left mandibular canine tooth (304) of a cat.
Small lesions at the gingival margin in cats often indicate tooth resorption (Figure 7). Although a thorough oral exam is not possible in all cats, magnification will help detect these painful lesions while still in the early stages. The mandibular third premolar is the most commonly affected tooth and requires moving the tongue lingually to view.
Q. How can we easily determine which side of the patient we’re looking at on a radiograph?
A. A radiograph that’s taken intraorally will always be properly oriented and ready for evaluation if radiographs are taken in the correct order as set up in the template. The maxillary crowns point down; the mandibular crowns point up. When viewing all views except the incisor views, I ask myself this question: “Is the patient’s nose to my right or to my left?” If the nose is to your right, it’s the patient’s right side (Figure 8). If the nose is to the left, it’s the patient’s left side.
Figure 8: The orientation of the molars and premolars in this radiograph shows that the nose would be on our right, so it’s the patient’s right side. (Note that the maxillary crowns will always be pointing down if correctly oriented in the template when taken, just as they appear in the patient.)
Figure 9: When evaluating incisors, radiographs are read just as if we were looking at the patient. The side where the arrow is pointing is on our left, so it’s the patient’s right side. (Note that the mandibular crowns will always be pointing up if correctly oriented in the template when taken, just as they appear in the patient.)
When viewing the incisors on an incisor view, remember it’s just as if you were face to face with the patient. Your right side is the patient’s left side and vice versa. So if I’m evaluating incisors on an incisor view on the left side of a radiograph it’s the patient’s right side (Figure 9).
Advertisement
Related Content
Advertisement


Latest CME


Advertisement
Advertisement
Trending on dvm360
1
Clinic center: New $15 million animal shelter proposed for Ellis County, Texas, following SPCA closure; Chewy Vet Care opens first North Florida practice in Jacksonville; and more
2
US pet insurance enrollment increased 9% in 2025, but more than 95% of cats and dogs remain uninsured
3
Top 5 behaviors every clinician should recognize
4
Bond Vet and Small Door Veterinary merge to form 55-clinic network
5