

|Articles|May 1, 2011
Dental extractions: diagnosis and simplified therapy (Proceedings)
Author(s)Peter Emily, DDS, DAVDC (Honorary)
Teeth are extracted for a number of reasons. These include periodontal disease, caries, advanced feline dental resorptive lesions apical abscesses, traumatic malocclusion, tooth root fracture, tooth crown fracture, retained deciduous, teeth, root tips, supernumerary teeth and client preference.
Advertisement
Indications for extraction
Teeth are extracted for a number of reasons. These include periodontal disease, caries, advanced feline dental resorptive lesions apical abscesses, traumatic malocclusion, tooth root fracture, tooth crown fracture, retained deciduous, teeth, root tips, supernumerary teeth and client preference.
There are many alternatives to extraction for the treatment of many of these conditions as described in other modules. Financial and other pressures may lead the client to request extraction.
Teeth with periodontal lesions are easier to extract than those which having normal bony support. The alveolar bone and periodontal ligament are weakened and progressively destroyed by the periodontal disease process. Rendering affected teeth more easily extracted.
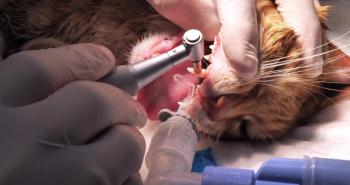
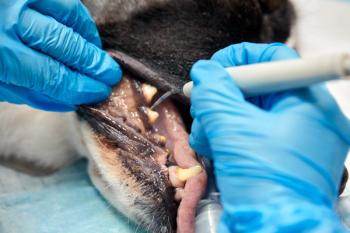
Extraction techniques
There are three extraction techniques for most carnivores and omnivores. Herbivores require a surgical extra oral approach for the extraction of' most of their teeth. Number of tooth roots, the amount of tooth retention, and the instrumentation requirements determine the exact technique.
Small single rooted teeth indicated for extraction are deciduous teeth or periodontal involved permanent incisors.
Deciduous teeth often seem to be the easiest to extract, but their small size, long delicate roots, and roots that are partially resorbed by the erupting permanent tooth make them more difficult too extract without root fracture. Patience and the delicate use of fine sharp instruments are preferable to the use of force, which usually results in root fracture. Fractured root tips are far more difficult to extract than intact teeth.
Four possibilities exist with fractured retained root tips. 1, if the root tip was fractured at the time of acute dental infection, such as advanced periodontal disease or Periapical involvement, the root tip will most likely serve as a source of continued infection. All efforts should be taken to remove root tips that at left when extracting these diseased teeth. 2, the root tip can simply resorb. 3, the root tip can become encapsulated in bone, and 4, the root tip can migrate out of the extraction site. As you can see, the last three possibilities suggest leaving these non diseased root tip fragments in place rather than induce unneeded trauma to the patient trying to remove these retained root tips.
Extraction techniques dental elevation
Extraction with the use of an only dental elevator is usually reserve for deciduous teeth. Permanent teeth that are loose as a result of periodontal disease can fall into this category.
When extracting deciduous teeth it is important to do as little damage as possible to the soft tissues and to avoid damaging the erupting permanent teeth.
Procedure
The epithelial attachment is cut with a #15 scalpel blade directed at 45 degrees to the long axis of the tooth. The attachment is cut around the entire tooth.
A sharp fine dental elevator is inserted between the tooth root and the crestal alveolar bone. It should be narrower than the root and as fine and sharp as possible to minimize bone trauma and the risk of root fracture. This is of particular importance when extracting retained temporary teeth or feline teeth both of which fracture readily.
The elevator is gently moved caudally and rostrally around the circumference of the root and pushed apically.
The periodontal ligament fibers are gradually cut, torn. The elevator should compress the tooth in all directions and held in place for approximately thirty seconds or more in all directions. This will fatigue the periodontal ligament fibers facilitating extraction. Hemorrhage of the periodontal ligament during elevation creates a hydraulic effect that can aid the extraction process. When the tooth is sufficiently loose, the final movement is to work the elevator down the anterior face of the root to its apex. The tooth will follow behind the elevator out of the socket and be removable with the fingertips. It is very important not to use a dental forceps for the final removal or extraction of these primary teeth even if they appear extremely loose. The end result almost always results in root fracture.
The roots of deciduous teeth are longer and narrower than those of their permanent counterparts. Normally, the roots are gradually resorbed as their permanent replacements begin to erupt. When the deciduous tooth is still in place and the permanent tooth erupts through the gingiva, this condition is classified as a retained deciduous tooth. These retained teeth often induce a dental malocclusion and should be removed as soon as possible. The roots of deciduous teeth are more likely to fracture than those of permanent teeth. Their length and small diameter along with partial resorption make careful elevation a must. With patience and a sharp fine elevator, these teeth are easily removed as described above.
Advertisement
Flap technique
In some circumstances it may be necessary to raise a flap to aid the extraction of multi-rooted teeth, particularly if buried root fragments are to be removed. Once the alveolar bone is exposed. The roots are more easily identified, as the bulges of the roots can be seen and palpated on the buccal plate of bone. Two basic principles of flap surgery manage management must be obeyed: 1), the line of incision and subsequent suture line must not lie directly over the bony defect. 2), the flap must be tension free.
Upper canine flap technique and extraction
Flap design is important. The flap should expose the entire lateral bony plate covering the canine tooth while addressing the principals of flap management. The line of incision is made one tooth either anterior or posterior to the canine at the discretion of the surgeon. The releasing incision is placed over the bony plate covering either the lateral incisor or the 1st premolar. The incision is carried just past the apex of the canine following the canine root morphology.
A sharp periosteal elevator is used to raise a full-thickness muco periosteal flap working the periosteal elevator tightly against the bone over the root of the canine. The flap is raised beginning at the attached gingival papilla. This produces a triangular shaped flap with one incision. The whole flap is reflected caudally or rostrally, exposing the alveolar bone. It is not necessary to release a flap on both sides of the canine.
The exact position and morphology of the canine root can be palpated over the lateral bulge of bone or canine eminence (Juga). Using a tapered fissure bur (size 701 / 703), or a pear-shaped bur (number 330 or 331 L) in a high-speed or slow speed hand piece with water irrigation, the labial plate of bone is incised to a mid-root depth following the canine root morphology both caudally and rostrally over the apex connecting the two sides.
A dental elevator of proper size is placed into the incised bony slot at the cervical line. The effect is to elevate the canine in a manner of unfolding the anterior aspect over the posterior. This will fracture the bone on the palatal aspect. The surgeon will experience a cracking sound with the beginning of total canine movement. Place the elevator in the rostral bony grove and elevate the canine anteriorly. Do not place an elevator into the palatal gingival grove and elevate the canine laterally. This can force the apex into the turbinates resulting in oro-nasal fistula formation.
Debris. Bony fragments and granulation tissue if present are carefully removed from the socket. Most will have been flushed out by the hemorrhage.
The crestal alveolar bone is carefully smoothed if necessary with a same dental bur (alveolectomy) to remove any sharp bony spicules, protrusions or ridges. A bone file can be used for the same procedure. The low or high-speed bur is used with saline irrigation. Debris is flushed from the site. Omission of this step interferes with the healing process. Sharp bone spicules are ischemic, and gingiva cannot grow successfully over sharp bony protrusions.
Oxytetracycline powder and piece gelfoam may be packed into the socket to control hemorrhage and post-operative osteitis. Such antibiotics should be avoided in immature animals where the developing enamel of the permanent dentition may be stained by systematically absorbed Oxytetracycline. A course injectable and/or oral antibiotic is advisable when an acute infectious state exists.
The flap is sutured by first suturing the attached gingival margin into position then suturing the rest of the flap. A final suture can be placed to approximate the lateral tissue to the palate at the surgeon's discretion.
Lower Canine Extraction
The root of the both the upper and lower canine tooth is large and long. It is normally firmly attached to the surrounding structures. The proximity of the maxillary canine root to the nasal cavity commonly results in the post-operative complication of an oro-nasal fistula. The mandibular canine root forms a large part of the rostral mandible, which is significantly weakened and often fractured during extraction, commonly with separation of the mandibular symphysis. Unless the periodontal tissues are severely compromised, the permanent lower canine tooth cannot be successfully elevated as for small, single rooted teeth, without causing extensive and unnecessary damage to the surrounding tissues. This method also takes a long time and is physically hard work. The following method is less traumatic, with fewer post-operative complications.
A triangular incision is made with a new, size 15 scalpel, severing the epithelial attachment on the labial and rostral aspects of the canine, extending caudally to the caudal edge of the second premolar, and progressing apically from the rostral gingival margin of the canine to the level of the apex, ensuring that the incision does not lie over the root of the canine, but rostral to it. This is the releasing incision.
A full-thickness gingivo-muco-periosteal flap is raised, using a periosteal elevator to separate the periosteum from the underlying bone. It is reflected caudally. When working on the mandible, care must be taken not to damage the nerves and blood vessels emanating from the mental foramen. The foramen lies under the apex of the lower canine.
The alveolar bone is exposed, revealing the canine eminence, which can be seen and palpated, but not as prominent as the upper canine eminence or Juga. Using a fissure bur (#701) or pear-shaped (#331L) bur with water irrigation, the labial plate of bone is incised to a mid-root depth completely around the border of the root.
An elevator is inserted halfway along the length of the root in the bony groove, rotated laterally using the alveolar bone as a fulcrum. The rostral and caudal borders are worked alternately. As the periodontal ligament fibers are weakened and torn the tooth loosens and is freed.
The irregular alveolar bony edges are smoothed off and all debris is removed from the socket and the exposed alveolar bone. The socket may be packed with Oxytetracycline powder. The flap is replaced in its original position. Absorbable sutures are used to close the incision along the rostral and gingival borders suturing the gingival margin over the extracted tooth socket to the palatal mucosa.
Multi-rooted teeth
Extraction with flap procedure
A new, size 15 scalpel is used to cut the epithelial attachment on the labial side of the upper first molar, the fourth premolar and half the third premolar, carefully retaining the interdental papillae. The releasing incision is made rostro-dorsally from the middle of the upper third premolar. The infra-orbital foramen is dorsal to the upper third premolar, its sensory nerves and blood vessels passing rostrally from it. Care should be taken not to sever these during this procedure. In extremely dolichocephalic breeds, it may be possible to direct the incision just caudal to the foramen, but the final incision must not lie over the roots of the upper fourth premolar. Where such redirection is not possible, the incision is stopped immediately ventral to the foramen, if a smaller flap is sufficient.
A sharp periosteal elevator is used to raise a full-thickness muco periosteal flap, working the periosteal elevator tightly against the bone over the roots of the upper fourth premolar, caudally and rostrally. The flap is of split thickness rostral to the infra-orbital canal, leaving the periosteum, nerves and blood vessels on the bone, but raising the gingiva and mucosa in the flap. The periosteum is cut immediately caudal to the infra-orbital foramen, to allow it to be raised in the flap caudally but left on the bone rostrally. The whole flap is reflected caudally, exposing the alveolar bone.
The exact location of the roots is determined; the lateral bulge of the alveolar bone over the roots is visible and palpable. Using a round (size I or 2) or pear-shaped (number 330 or 331L) bur in a high-speed hand piece with water irrigation, the labial plate of bone is incised to a mid-root depth extending apically 4-5mm (i.e. beyond the furcation).
If a flap is reflected, the flap is replaced in its original position after the extraction with absorbable sutures. The sutures are placed over the rostral or caudal bone adjacent to the extraction site. The gingival margin can be sutured over the extracted tooth sockets to the palatal mucosa.
The flap method with gross removal of alveolar bone is often reserved for complicated cases. The removal of the labial bone automatically creates a weakness. Where possible, the elevation or leverage techniques are preferred, as the whole labial bony plate is preserved.
The extraction procedure can be performed without the reflection of a lateral flap if the veterinarian so desires. All of the following tooth sectioning, retentive alveolar bone removal and palatal root removal can be accomplished without reflecting a lateral flap. If this technique is employed a tapered fissure course diamond bur is preferred. Steel burs will grab tear and rip the gingival tissues while diamond burs will cut the periodontal fibers without tearing. Diamonds are always using with water irrigation to facilitate cutting and to prevent clogging of the diamond cutting surfaces. The fissure diamond is directed into the periodontal ligament, separating it from the tooth crown and roots.
Multi-rooted teeth are divided into single rooted sections, which may then be extracted as previously described for small, single-rooted teeth or using the following leverage technique. In complicated situations, a flap procedure may be indicated. The upper fourth premolar is the most difficult multi-rooted tooth to extract and so will be used as the example.
Leverage technique
The furcation of the roots is identified; delicate use of the elevator to reveal these landmarks may be necessary. A cross-cut tapered fissure bur (e.g. number 701) or the course tapered fissure diamond bur is used at high or slow speed with water irrigation to separate the tooth into three single-rooted sections. These separations can also be made in a low-speed hand piece and a cutting diamond disc. However, diamond discs are generally too large for use in the mouth and rather difficult to control; they can slip lacerating the animal's tongue, gingiva, palate, lips, cheeks and the practitioner's fingers. If power equipment is not available, a hacksaw blade or an embryotomy wire can be used with considerably more difficulty to section the teeth.
The palatal root is cut first, with a diagonal cut from the medio-caudal aspect latero-rostrally, through the furcation. The rostral and caudal sections are then separated cutting obliquely from the furcation through the crown. The line of the cut should follow the buccal grove of the tooth.
Approximately 4 to 6 mm of the labial (lateral) alveolar bony crest is removed from the labial, rostral and caudal surfaces roots using the fissure or pear-shaped (#330) bur or diamond, with irrigation. The gingival flap if used, is retracted out of the surgical field.
A cross-cut tapered fissure bur (#701) can used to cut a one mm deep horizontal groove in the rostral aspect of the rostral root and the caudal aspect of the caudal root at the roots. These grooves act as the purchase points for leverage with the elevator.
A strong straight elevator is placed between the rostral and caudal sections of the crown to lightly wedge the two sections apart to ensure they are separated.
The straight elevator is then inserted horizontally between the caudal groove and the adjacent tooth (upper first molar), engaging the edge of the elevator in the groove.
The elevator is rotated to elevate the caudal root while displacing it rostrally using the 1st molar as a fulcrum. This rotation is relaxed and repeated several times until the root starts to loosen. If the 1st molar is missing, the alveolar bone is used as the fulcrum.
In a similar fashion, the elevator is engaged in the rostral groove and rotated using the adjacent tooth (upper third premolar) or the alveolar bone as a fulcrum, elevating the root caudally. The rostral often is the most difficult to elevate. This is primarily due to the large septal bone occupying the furcation space between the roots. The bone is tightly wedged against the rostral root preventing the necessary distal pathway needed for extraction. The root will elevate easier and without the fear of root fracture after the bony septum is removed. The septal bone can be removed with a fissure bur or with a small end cutting rongeur.
It is rarely necessary to use dental forceps once the retaining bone has been removed. The roots are then easily elevated with the elevator.
Advertisement
Related Content
Advertisement


Latest CME


Advertisement
Advertisement
Trending on dvm360
1
Every 30 extra minutes under anesthesia raises complication risk in brachycephalic patients, underscoring the importance of peri-anesthetic management
2
FDA issues emergency use authorization for ivermectin solution to prevent screwworm in horses
3
From the CVO: I’m off the clock
4
Paws and profits: VetEvolve names first chief veterinary officer, NVA appoints two board members, and more updates
5