

|Articles|December 1, 2010
Bilateral mandibular fractures due to periodontal disease
Continuing chronicles illuminating repair techniques used in this particularly challenging case.
Advertisement
Last month's article described an attempt at definitive unilateral mandibular fracture repair using titanium mesh in a Shih Tzu. On the third postoperative day, the patient removed the Elizabethan collar and created a similar fracture in the opposite mandible. Consequently, we were faced with bilateral mandibular fractures and only four remaining teeth (canines). This case was further complicated by severely compromised mandibular bone quality and quantity secondary to severe periodontal disease.
Repair techniques overview
Noninvasive mandibular fracture repair ideally uses the existing teeth as anchors for wire or acrylic splints. Screws used to secure plates often traumatize teeth as well as the inferior alveolar artery and nerve within the mandibular canal. Screws also lack sufficient purchase when used in mandibles in which bone is compromised from periodontal disease.
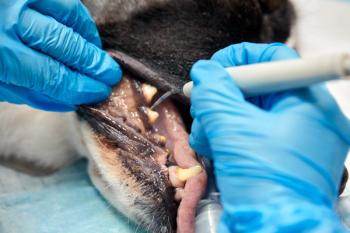
A possible alternative in this case was stabilization with composite bonding of the mandibular and maxillary canine teeth—a simple and quick procedure that has been used to successfully repair mandibular fractures in dogs and cats. Cats are particularly well-suited anatomically because of their long canine teeth that allow direct splint application (Photo 1).
Photo 1: The canine bonding for fracture repair in a cat. The close approximation of the canines simplifies the technique in this species. (Photos courtesy of Dr. Beckman)
Adjustments for this challenging patient
Several factors in this patient made use of the composite bonding technique challenging. Lateral deviation of the mandibular canines, comparatively shorter canine teeth compared with mesocephalic dogs and an increased space between the maxillary and mandibular arcades required some adjustments to our traditional approach.
To compensate for these challenges, we created a flexible mold using suction tubing to span the gap between the arcades, serving as a reservoir for the composite (Photo 2). We measured and cut the mold to allow enough room between arcades so the patient could comfortably lap up gruel with its tongue.
Photo 2: The fabricated suction tubing used to accommodate the challenges with this canine patient.
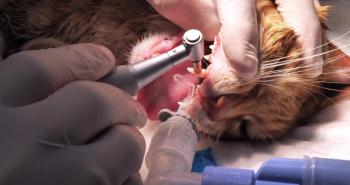
After anesthetizing the patient, we carefully prepared the teeth to ensure optimal bonding of the composite. The teeth were thoroughly scaled and then polished with flour pumice to remove all plaque, which would retard the composite's ability to adhere to the tooth. Fluoride-containing pastes will interfere with material setup, necessitating the use of pumice.
We then etched the canine teeth with 37 percent phosphoric acid for 30 seconds. The etchant was thoroughly rinsed and dried with an oil-free air source. A thin layer of primer/bonding agent was placed on the canine teeth and then light-cured (Photo 3). Instructions for working with bonding agents vary considerably from manufacturer to manufacturer, so always read and follow the directions exactly to ensure optimal bonding.
Photo 3: Light-curing a bonding agent on another patient.
Advertisement
We then placed flowable composite into the mold. The fractures were reduced by recreating proper occlusion (Photo 4), and the composite was light-cured to harden it. We used an accelerated light-cured composite that cures in five seconds. After placement, we attempted to open the mouth with moderate force to ensure the composite's stability.
Photo 4: The suction tube splint after fabrication.
Postoperative care and further troubles
The owner was instructed to maintain the Elizabethan collar at all times, except when the dog was continually observed during eating. Multimodal analgesia was initiated with orders to be continued indefinitely pending recheck.
Regrettably, the patient returned two days later with the composite fractured and dislodged from two of the canine teeth. Remember, this patient is extremely active, despite the fractures. We speculated that the technique failed in this patient because of the anatomical challenges described above. A much more aggressive approach with a more secure device and orders for strict cage rest would be required if we were ever to achieve stability long enough for these fractures to heal.
Once again, teeth would provide an excellent anchor to stabilize both jaws with wire and acrylic; however, this patient was edentulous except for the canines. Unfortunately, we cannot manufacture teeth to provide an anchor for a more aggressive and more stable splint. Or can we?
An unusual approach to care
Faced with a difficult patient and challenging, bilateral mandibular fractures, we determined that device stability was paramount. We constructed a U-shaped acrylic splint spanning both mandibles.
The patient was anesthetized, and the remnants of the composite were removed from the canine teeth. Tooth preparation for the application of two composite orthodontic buttons on the mandibular canine teeth was performed exactly as described for the placement of the composite splint above. Once the bonding agent was cured, we filled a silicon mold with flowable composite (Photo 5). We then placed the mold on the distal and lingual aspect of the crown and light-cured it. When the mold was pulled off, a button remained to act as an anchor for the rostral portion of the splint.
Photo 5: A silicon orthodontic button mold and flowable composite were used to form the rostral anchor for the acrylic splint.
Next, we used a 20-ga needle to pass a 26-ga wire around the mandibular body in a fashion similar to that used for mandibular symphyseal repair. The wire exited dorsally on the lingual and vestibular mucosa and was tightened to rest just atop the dorsal oral mucosa without impinging directly on the mucosa (Photo 6).
Photo 6: Circumferential mandibular wires form a portion of the splint anchor.
Two wires in front and back of the fracture line were used bilaterally. The wires were then bent to form loops. These loops served as points of attachment for a Masel chain (used in human and veterinary orthodontics), which spanned from caudal loop to caudal loop and incorporated the two canine buttons (Photo 7). Tension from a Masel chain aids in approximation of the fracture ends.
Photo 7: A Masel chain is shown spanning the right mandible. The chain was continued in a horseshoe pattern to incorporate the left mandible before placing the acrylic and completing the splint.
Final step
The last step in splint fabrication involved using a temporary crown and bridge material. An associate held the fracture fragments in apposition while the splint material was applied, working around the chain and incorporating it and the wires for maximal stability. We kept the acrylic off the mucosa. A true bridge was formed spanning both jaws, thus avoiding the complication of mucositis from acrylic and mucosa contact (Photo 8).
Photo 8: The finished splint was thick and rigid to provide stabilization and prevent destruction by a very active patient.
Remarkably, the patient tolerated the splint extremely well (Photo 9). The client was able to cage rest the patient for close to two months, and radiographs taken at that time showed complete healing of both mandibles (Photos 10 and 11). The splint, wires, Masel chain and composite buttons were removed.
Photo 9: The patient tolerated the final splint well.
Success at last, right? Not so fast. A portion of the titanium mesh had migrated slightly, penetrating the lingual mucosa and creating a small laceration on the tongue. The mesh was removed, and the patient proceeded to do exceptionally well.
Photo 10: A radiograph of the right mandible at the time of device removal.
This was a very difficult and frustrating case, to say the least. Edentulous mandibular fractures are completely preventable with regular dental oral examinations, periodontal prophylaxis both at home and in the hospital and periodic radiographic evaluations. We hope our next case won't be quite as involved or as frustrating.
Photo 11: A radiograph of the left mandible at the time of device removal.
Dr. Beckman is acting president of the American Veterinary Dental Society and owns and operates a companion-animal and referral dentistry and oral surgery practice in Punta Gorda, Fla. He sees referrals at Affiliated Veterinary Specialists in Orlando and at Georgia Veterinary Specialists in Atlanta, lectures internationally and operates the Veterinary Dental Education Center in Punta Gorda.
Advertisement
Related Content
Advertisement

Latest CME


Advertisement
Advertisement
Trending on dvm360
1
Tornado (the dog) touches down at the emergency department
2
Every 30 extra minutes under anesthesia raises complication risk in brachycephalic patients, underscoring the importance of peri-anesthetic management
3
Paws and profits: VetEvolve names first chief veterinary officer, NVA appoints two board members, and more updates
4
Q&A with an emergency veterinarian on critical care and common ER misconceptions
5