

|Articles|June 9, 2015
Wound repair techniques: Transposition flaps
Author(s)Steven F. Swaim, DVM, MS
Consider performing this reconstruction technique the next time you need to repair a square or rectangular wound and direct closure could result in the distortion of a body structure-or when skin for closure is only available on one side of the wound.
Advertisement
A transposition skin flap is a segment of skin and subcutaneous tissue or panniculus muscle (e.g. cutaneous trunci) that is lifted and has its orientation shifted as it is placed onto a wound. Thus, the flap is transposed to close the wound.
Transposition flaps are generally rectangular in shape and lend themselves well to the closure of square or rectangular wounds. The flap turns on a pivot point to reach the nearby defect. It may be directly adjacent to the defect (Figures 1A-1C) or at any angle up to 180 degrees to the defect. However, increasing the angle results in a decrease in effective flap length and increases skin folding at the flap base and the possibility of kinking the flap's blood supply. Thus, 90 degrees is the usual upper limit to flap design related to the defect.
1A. Débriding the edge of a wound over the left lateral epicondyle of the humerus.
1B. A transposition flap incised in skin on the caudolateral aspect of the humerus (broken line). The flap is immediately adjacent to the wound (F = transposition flap). The direction of the flap rotation is indicated by the arrow.
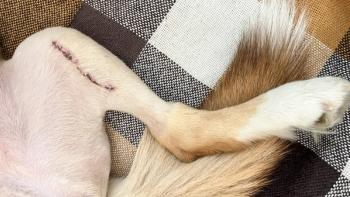
1C. A transposition flap sutured in place over the wound.Adequate skin for repairing a defect may not be available in the plane of the defect; for example, skin may only be available on one side of the defect, eliminating the possibility of a bipedicle advancement flap. In addition, direct closure (stretching skin) could result in distortion of a body structure (e.g. eye or anus). Thus, when skin is not available in the plane of the wound but skin is available in a nearby plane, a transposition flap can be used to close the defect.
PREOPERATIVE WOUND TREATMENT
Treat the wound as an open wound until contamination is eliminated, debris is removed and infection is controlled. Use staged débridement and lavage to remove definitely nonviable tissue and debris at each bandage change. This tissue will be white, black or not attached to the wound and will have no blood supply. Leave tissue with questionable viability, and reevaluate it the next day.
Perform wound lavage simultaneously with débridement. Physiologic saline solution or a 1:40 dilution of 2% chlorhexidine diacetate or gluconate solution in sterile water should be used for lavage. A 30-ml syringe with an 18-ga needle delivers lavage solution at 17 to 18 psi (± 7 to 10 psi). An alternative technique for delivering lavage solution is to pressurize an intravenous bad of fluids to 300 mm Hg with a pressure cuff and deliver the fluids via a 22- to 16-ga needle on a standard intravenous drip set. This provides a pressure of 7.1 to 7.3 psi (±0.1 psi).1
Topical antibacterial medication (e.g. silver sulfadiazine, povidone-iodine, chlorhexidine, nitrofurazone) may not be necessary, but if it is needed, it can be applied to the wound. Although some topical medications can have a negative effect on certain stages of wound healing, the main concern during the inflammation-débridement phase of wound healing is controlling infection. In some cases, systemic antibiotics may be indicated for infection control.
Topical wound healing stimulants can also be applied. The repair stage of wound healing is stimulated, as reflected by the early appearance of granulation tissue. Examples of topical wound healing stimulants include an acemannan-containing gel (Carravet Acemannan Wound Gel-Carravet), a maltodextrin NF D-glucose polysaccharide (Intracell-MacLeod Pharmaceuticals) and a tripeptide copper complex (Iamin Hydrating Gel Wound Dressing-Folica).
ADVANTAGES AND DISADVANTAGES
Flaps have the advantage of carrying their blood supply with them to maintain their viability. Thus, they can be placed over less-than-optimal wound beds, such as exposed bone or irradiated tissue. However, if a healthy bed of granulation tissue can be produced over such tissue, additional vascularization can invade the dermal surface of the flap.
Transposition flaps also have the advantage of providing tension relief when they are used to close a defect in which skin is available on only one side of the defect. When nearby skin is available in a different plane than the defect is in, the greater the angle between the wound and the skin for the proposed flap, the less the tension at the repair site.
2. The rotation of the transposition flap around a pivot point (X) results in a loss of effective length the more the flap is rotated. (Adapted from Grabb WC. Classification of skin flaps. In: Grabb EC, Myers MB, eds. Skin flaps. Boston: Little, Brown and Co, 1975;149.)One disadvantage of transposition flaps is that they lose effective length the more they are rotated (Figure 2). However, that can be compensated for when designing the flap by extending its length. Even with this compensating procedure, there will be occasions when the location of a wound will preclude lengthening the flap (a body structure will not allow for appropriate flap lengthening). For example, in Figure 1, lengthening the adjacent flap would have required cutting into skin over the point of the olecranon with the risk of developing of a chronic wound over this pressure point. The elasticity of the dog's skin may allow for the flap design to be somewhat less than the ideal length and still provide wound closure without excessive tension.
Another potential disadvantage of transposition flaps is the development of a large dog ear at the base of the flap. If the dog ear does not regress over 14 to 21 days, then a second surgery may be necessary to correct it. As with other types of reconstructive surgery, dog-ear correction requires creating a wound to correct a wound.
A minor disadvantage of transposition flaps is that the hair growth direction on the flap may differ from the surrounding hair because of the rotation of the flap during transposition.
FLAP DESIGN
When designing a transposition flap, two measurements can help ensure that the flap is the proper width and length. First, the width of the flap should be the same as the width of the wound. Second, from the standpoint of length, diagonal measurements should be made to provide a flap length that will compensate for the loss of effective length as the flap is rotated into position over the wound. The diagonal from the pivot point of the flap to the far corner of the wound should be equal in length to the diagonal from the flap's pivot point to the opposite corner of the flap. These measurements hold true whether the flap is directly adjacent to the wound or at a right angle to the wound (Figures 3A & 3B).
3A. When designing a transposition flap adjacent to the wound, the flap's width should be equal to the width of the defect (bp=ab). The diagonal length from the flap's pivot point to the far point of the wound (pc) should be equal to the diagonal length of the flap from the pivot point (pd). (Adapted from Swaim SF, Henderson RA. Small animal wound management. 2nd ed. Baltimore, Md: Williams and Wilkins, 1997;258.)
3B. When designing a transposition flap 90 degrees from the wound, the flap's width should be equal to the width of the defect (ap=ab). The diagonal length from the flap's pivot point to the far point of the wound (pc) should be equal to the diagonal length of the flap from the pivot point (pd). (Adapted from Swaim SF, Henderson RA. Small animal wound management. 2nd ed. Baltimore, Md: Williams and Wilkins, 1997;258.)Survival of the entire flap depends on having adequate blood supply for its full length. Length-to-width ratios have been stated for flaps to help ensure sufficient vascularity. However, “specific recommendations for flap length to width are not possible because blood supply varies among individuals and regions of the body.”2 If a flap undergoes avascular necrosis, the part of the flap that dies is the part that is needed most-the end of the flap. When this occurs, my approach to the problem is to remove the devitalized tissue and consider another form of reconstruction for the open area (e.g. healing by second intention, mesh graft or pinch/punch grafts).
Once the flap has been drawn on the skin, manipulating a piece of sterile cloth or sterile paper covering from surgical gloves the size of the flap and the underlying skin can help confirm that the flap design will provide sufficient skin for defect repair and closure of the flap donor site (see Steps 5 and 6).
How to perform a transposition flap
After anesthetizing the patient, position it so that the wound and a large area of surrounding skin can be clipped and prepared for aseptic surgery. It is preferable to err in favor of preparing too large of an area rather than too small. If an insufficient area is prepared, the unprepared area may be pulled from under the surgical drapes during wound closure.
Protect the wound area from hair clippings and preparation solutions by placing sterile lubricant and protective gauze on the wound surface. In the cadaver demonstration shown in this article, the basically rectangular wound is below the right eye.
Advertisement
Step 1
Manipulate the wound edges to see if direct closure is possible or if it could result in ectropion. If direct closure is not an option, look for skin that you can transpose onto the wound (FA = flap area). In this case, there is available skin for a flap in the lateral caudal cephalic area behind the eye.
Step 2
Design the flap on the skin at the caudoventral aspect of the defect. The width of the wound is 2 cm, so the flap width needs to be 2 cm. Mark this measurement at the caudoventral corner of the wound, thus establishing the width of the flap at its base (distance from A to B in illustration below). Draw two parallel lines, 2 cm apart, ventrally on the skin from the measured width marks (distance from A to B in illustration below) at the flap's base.
Step 3
Measure the diagonal from the pivot point of the flap to the far corner of the wound (distance from A to C in photo below).
Step 4
Measure the length of the diagonal in Step 3 from the pivot point of the flap to the cranial-most line of the two parallel lines forming the flap edges. From this point, draw a line to connect the cranial and caudal lines of the flap to create a squared end on the flap (see broken line in photo below-the line is under the ruler).
Step 5
To confirm that the flap is long enough to cover the defect, lay a piece of sterile cloth the size of the flap over the drawn flap.
Hold the portion of the cloth over the base of the flap tightly against the skin while rotating the other end of the cloth over the wound.
Step 6
To confirm that the flap donor site can be closed after the flap is transposed, hold the cloth over the base of the flap firmly in place while pinching together the cloth and underlying skin of the flap.
Step 7
Incise the flap along with any underlying panniculus muscle. Undermine and elevate the flap as needed.
Then rotate the flap into position over the wound with no tension.
Step 8
Suture the flap into place with simple interrupted sutures of 3-0 monofilament polypropylene. If a dog ear of skin forms at the base of the flap on the edge opposite the pivot point (see arrow in photo below), leave it alone for now (
Step 9
Suture the donor site with simple interrupted sutures of 3-0 monofilament polypropylene.
If necessary, undermine around the donor site to allow for a tension-free closure. Dead space under a flap is best managed by placing a drain under the flap. Placing tacking sutures under a flap could cause occlusion of important blood vessels, resulting in avascular necrosis.
POSTOPERATIVE CARE
If you are concerned about the patient molesting the surgical site or if a drain has been placed under a flap, cover the area with a bandage, if possible. You can use a tie-over bandage in difficult-to-bandage areas. If the surgical site is in an area that cannot be bandaged, having the patient wear an Elizabethan collar can prevent wound molestation. If a drain is present, assess the amount and nature of drainage at each bandage change. When the drainage has decreased to a small amount, usually within three or four days, remove the drain.
Correcting dog ears at the time of flap creation is not necessary and may be contraindicated. It could damage the blood supply to the flap, thus jeopardizing flap survival. If left for 14 to 21 days after flap creation, some dog ears-usually small ones-will flatten and not need surgical correction. If dog ear correction is necessary, several techniques are available (
References
1. Gall TT, Monnet E. Evaluation of fluid pressures of common wound-flushing techniques. Am J Vet Res 2010;71:1384-1386.
2. Hunt GB. Local and subdermal plexus flaps. In: Tobias KM, Johnston SA, eds. Veterinary surgery: small animal. St. Louis, Mo: Elsevier/Saunders, 2012;1243-1255.
Suggested reading
1. Hedlund CS. Large trunk wounds. Vet Clin North Am Small Anim Pract 2006;36:848-872.
2. MacPhail CM. Surgery of the integumentary system. In: Fossum TW, ed. Small animal surgery. 4th ed. St. Louis, Mo: Elsevier/Mosby, 2013;190-288.
3. Pavletic MM. Atlas of small animal wound management and reconstructive surgery. 3rd ed. Ames, Iowa: Wiley-Blackwell, 2010.
4. Swaim SF, Henderson RA. Various shaped wounds. In: Small animal wound management. 2nd ed. Baltimore, Md: Williams and Wilkins, 1997;235-274.
Steven F. Swaim, DVM, MS
Professor Emeritus
Scott-Ritchey Research Center
Department of Clinical Sciences
College of Veterinary Medicine
Auburn University, AL 36849
Advertisement
Related Content
Advertisement


Latest CME


Advertisement
Advertisement
Trending on dvm360
1
Weekly Vet Report: 9 Screwworm cases (including a dog), new OTC screwworm treatment authorized, & more
2
Fiber-blend supplement shows promise for gut health in study
3
ACVIM celebrates award-winning 2026 resident research abstracts
4
dvm360® to honor the Veterinary Heroes™ during awards ceremony at Fetch Kansas City
5