
|Articles|August 1, 2008
Setting up cytology in your practice (Proceedings)
Author(s)Mary Jo Burkhard, DVM, PhD, DACVP
Cytolopathology: the laboratory and microscopic evaluation of cells and fluids.
Advertisement
Cytolopathology: the laboratory and microscopic evaluation of cells and fluids. Sources of cells include tissue aspirates, imprints, scrapings, body fluids, or lavage fluids.
Pros: Cytology is useful for establishing a diagnosis or can narrow the list of differentials for effusions, masses, lymphadenopathy, or organomegaly. It is rapid, inexpensive, and (usually) only minimally invasive.
Cons: Cytology does not provide information about tissue architecture. Obtaining an appropriate sample is critical for obtaining the correct diagnosis. Secondary processes can confound the diagnosis. Complications are possible and include tumor hemorrhage, infection, and tumor seeding.
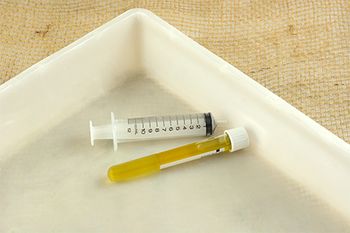
Equipment and supplies needed to perform cytology in practice are minimal and include a good microscope, 22-25 gauge needles, 3-20 ml syringes, glass microscope slides, a hematologic stain appropriate for cytology, and immersion oil.
The microscope
There a few key considerations when choosing a microscope. First, it is ideal to have two microscopes in practice – a basic microscope for performing fecals and urinalyses and a higher end microscope for cytology. Microscopes suitable for cytology are called 'compound microscopes' because a combination of lenses are used to visualize the image. The microscope head supports the oculars which may be straight or inclined. An inclined binocular head that can move up and down are the most comfortable and allow adjustment for users of multiple heights. A trinocular head should be purchased if you anticipate photomicrography, addition of a second head, or a video link. While these may seen like a luxury, they can be very useful for training technicians within the clinic, obtaining second opinions from colleagues, and demonstrating abnormalities to clients. With the relatively minor cost investment of a trinocular head, additional attachments can be added at a later time point. The nosepiece is the part of the microscope that holds the objectives. This should rotate smoothly.
Objectives are the most important, and most costly, components of the microscope. There are three basic types of objectives – achromatic, semi-apochromatics (also called fluorite) and apochromatic. Achromatics are the most common, least expensive, and least corrected form of objectives. Fluorite objectives have additional spherical correction. Apochromatics, the most expensive and most corrected optics, are primarily used for research and high-end photography. Plan objectives have additional flat field correction – important for the ability to simultaneously focus on the center and the periphery of the field. Most microscope objectives are either plan achromatic or plan fluorite.
Objectives are often referred to as 10x, 40x, etc. The number is the numerical aperture and is a measure of the resolving power of the objective with higher numbers indicating higher resolution. For cytology, it is critical to, at minimum, have a 10x and 100x oil immersion objective. Additional objectives however also have usefulness. Addition of a 4x objective allows low power scanning for clumps and large organisms. 20x and 40x objectives allow higher magnification screening and comparison of cell morphology between clusters. However, it should be noted that most 40x objectives require that the sample be coverslipped to allow optimal focus. While usually more expensive than a 40x dry objective lens, a 50x oil immersion lens provides excellent clarity and the ability to visualize a larger field area.
Oculars are another critical part of the microscope. The most common type used in cytology are called Huygenian, or negative oculars. To maximize compatibility, it is best to purchase oculars and objectives from the same source. Wide-field oculars allow visualization of a larger area on the slide which can be particularly useful for examination of cytologic samples as it allows simultaneous viewing and comparison of a greater number of cells than does a standard field ocular. High-point eyepieces are designed such that the 'eye point' is above the surface of the lens of the eye. They are especially useful for those who wear glasses but also help to reduce eye fatigue in microscopists who do not wear glasses.
Advertisement
The microscope condenser should have a numerical aperture equal to or greater that than the numerical aperture of the highest power objective intended for use on the microscope. The mechanical stage should operate smoothly. Most microscopes can accommodate left or right handed stages based on the preference of the operator. The microscopes should have both a coarse and fine focus. The light source may be in the base or the back of the microscope but should be adjustable.
Koehler illumination is used to align the light for microscopy so that the sample is uniformly illuminated, bright, and free from glare. First, focus on the specimen at the objective to be used. Close the field diaphragm which is located at the base of the microscope where light comes out. You should see the light reduced to the center of the field. If the area of light is not in the center of the field, use the centering screws (usually silver) attached to the condenser to center the light. Adjust the condenser vertically using the condenser focus knob until there is a sharp demarcation between the light and dark interface. Finally, re-open the field diaphragm to just outside the field of view. Open the condenser to allow the appropriate amount of light to enter.
Sample acquisition
Slides can be made from samples from fine needle aspirates, swabs, touch imprints, scrapings, or fluids. Mass lesions are commonly sampled by fine needle aspiration but if a biopsy is obtained, touch imprints can also be made for cytologic examination. Superficial cutaneous lesions and discharges can be evaluated by scrapings or direct imprints (although this may miss the underlying disease). Fluids may be sampled by aspiration or washes (e.g. TTWs).
When performing a fine needle aspiration (FNA), the need for sedation or anesthesia is influenced by multiple factors including the location of the lesion, potential adverse effects (e.g. hemorrhage, pneumothorax), and the temperament of the animal. FNA is performed using 18-25 gauge needles of various length. In most cases, a 22 gauge needle is adequate for obtaining a quality sample for examination and minimizes the potential of hemorrhage and discomfort to the patient of using larger needles. Numerous styles of collection have been described. Some people prefer to use needles without syringes, others use needles attached to syringes ranging from 3ml to 20ml in size, and still others use needles connected to an extension set and then a syringe. Increasing syringe sizes allows increased suction for aspiration, however this also increases the amount of blood contamination in the sample and the risk for adverse effects. Large syringes may also be cumbersome for those with small hands. "Needle only" aspirations tend to retrieve the fewest cells, however the samples also tend to have minimal contamination with blood or the surrounding tissue and may be the most representative of the lesion. To aspirate, the tissue or site is immobilized with one hand and the needle tip is rapidly advanced into the tissue and then moved back and forth 5-10 times. Maintaining a single needle path will minimize the disruption to the surrounding tissue and the potential for contamination. If possible, long passes should be made through the tissue however the needle tip must remain within the lesion. Following aspiration, suction (if used) on the needle is discontinued and the needle is then rapidly withdrawn. If a syringe was used, the needle is removed, the syringe filled with air, and the material is expelled onto glass slides. If FNA was performed without a syringe, the needle is placed onto an air filled syringe, and the material then expelled onto glass slides. It is best to place material on the center of the slide as material near the edges, top or bottom may be difficult to access by the objectives or may not be within the staining area of some staining procedures. The material is then gently 'squashed' by placing a second slide perpendicular to the first, on top of the expelled material, and gently pulling it down the long axis of the sample slide.
Fluids can aspirated directly by needle and syringe, through catheters, or via washes. Unclotted samples can be placed in red-top tubes, those you suspect may clot should be placed in an EDTA tube. An aliquot should be taken for obtaining the cell count and protein concentration. Samples with low cellularity can be concentrated by spinning the sample, removing the majority of the supernatant, and resuspending in a smaller residual volume. Slides can be made from fluids in a similar manner as blood films would be made, however the 'squash' method described for FNAs also works well for fluids, and often produces much more readable slides with larger numbers of the atypical or inflammatory cells clustered in the center which allows for easier side-by-side comparison. A careful examination of the fluid should be made for visible clumps of cells or mucus. If found, these should be examined by the squash technique as they will often contain a majority of the cells in the sample.
Touch impressions and tissue scrapings can also be used to make slides for cytologic evaluation. Touch impressions are most often created using biopsied material, however if the animal has an ulcerated or exudative lesion, a slide can be touched directly to the lesion. This latter approach often misses the underlying process, but is occasionally diagnostic. To make a touch impression, first gently blot a freshly cut surface of an excised mass or the lesion surface. Then gently touch the surface of the mass or lesion to a clean glass slide multiple times. If the excised mass does not exfoliate well, it can be scraped with a scalpel blade to increase the number of cells obtained for examination.
Slide preparation and staining
Use only clean, new slides. Slides with a frosted edge are easier to label; it is helpful to put the sample on the slide with the frosted or matte side up! Dry the slides rapidly to fix the cells on the slide (a hair dryer on 'low' may be useful'). Do not fix the slides in alcohol. Prepare and store slides away from formalin and extreme temperatures to avoid fixation and staining artifacts. Be gentle. Broken cells cannot be used to make a diagnosis.
Samples should be thoroughly dry before staining or they will have refractile water artifact within the cells. Romanowsky-type stains are most commonly used for staining cytology samples, these are the same stains that are used for staining blood films. Nearly all of the pictures in veterinary cytology texts are from Romanowsky stained material. These stains provide good nuclear and cytoplasmic detail. When using these stains, red blood cells stain red-orange, nuclei stain blue-purple and cytoplasm stains blue to pink. Examining the erythrocytes and leukocytes present on nearly every slide provide an internal control for stain quality. The quick stains (Diff Quik, Dip-Stat) are inexpensive, fast and easy to use but mast cell granules (as well as some granules from cells in avian and exotic species) may degranulate and the cells will appear as non-granulated cells. Reducing the time in the 'fix' solution may decrease the degranulation, however the stain penetration may also be reduced. Wright's and Giemsa based stains are often used in automatic stainers however several commercial sources sell stain appropriate for hand staining as well as automated stainers. Stains need to be filtered, changed, or topped off on a regular basis. Old or contaminated solutions will produce poorly stained specimens. Thick specimen may need additional time in the stain solutions. Coverslipping with mounting media (e.g. Shandon-Mount) and a cover slid is useful if you want to retain the samples and is critical if you want to examine the slides under 40x objectives. Once the coverslips are completely dry and mounted, oil can simple be wiped off with lens cleaner. Oil can be removed from uncoverslipped slides using xylene or Histoclear.
Sending material to reference laboratories
Make one or two direct smears, let the smears air-dry, and submit the smears with fluid. If cell degeneration or microbial growth occurs during shipment, the pathologist can evaluate the smears that you submitted. If you stain and examine a slide, send the slide along with the unstained slide(s) as often only one or two slides contain diagnostic material. Contact the laboratory for mailing containers and instructions for sending specimens. Provide signalment, brief history, relevant physical examination findings, previous therapy, results of pertinent diagnostic tests, site from which sample was collected, tentative diagnosis or differentials.
Helpful hints
- Thoroughly clean off the ultrasound gel before taking an ultrasound guided FNA. Ultrasound gel causes lysis of cells and appears as a particulate purple material that obscures the slide.
- Do not place drops of fluid or expel material from a FNA onto a slide and let it dry - the sample will be too thick.
- Speed counts. Minimize the time the needle is in the lesion and sample preparation will enhance the quality of the sample.
- Obtain several good textbooks on veterinary cytology with an array of pictures.
- Some tissues may not shed cells well due to dense stroma or strong celltocell attachment. If you don't get a quality cytology sample by FNA a wedge or excisional biopsy is more likely to provide diagnostic material than a needle biopsy.
Advertisement
Related Content
Advertisement
Latest CME


Advertisement
Advertisement
Trending on dvm360
1
New World screwworm updates: The latest on government, industry response, new cases
2
‘This is not going to be an isolated incident': Q&A with a parasitologist on the New World screwworm's return to the US
3
New World screwworm confirmed in United States, USDA announces
4
Dog rescued from landfill undergoes complex orthopedic surgery at UC Davis
5