

|Articles|April 1, 2010
Putting your complete dental prophylaxis into steps (Proceedings)
Author(s)Jeannie Losey, RVT, VTS (Dentistry)
The term "prophylaxis" originates from the original Greek, and means to guard or prevent. It applies to any medical term or public health procedure whose purpose is to prevent, rather than treat or cure disease.
Advertisement
What is a prophylaxis?
The term "prophylaxis" originates from the original Greek, and means to guard or prevent. It applies to any medical term or public health procedure whose purpose is to prevent, rather than treat or cure disease.
When used in the veterinary dentistry context, this has become a "catch all" term for teeth cleanings and most periodontal care. THIS NEEDS TO CHANGE!!
Periodontal disease could be considered as the most common health problem seen in small animal practice today. Statistics indicate that 80% of dogs and 70% of cats will have some form of dental disease by the age of 3, with plaque buildup being the underlying cause. Four primary treatment stages exist when discussing dental disease management. These should be explained to the client to give them a better understanding of how oral disease progresses, and how it can be prevented through proper prophylaxis.
Dental prophylaxis
Cleaning and polishing
Periodontal therapy level 1
Subgingival curettage/closed root planing
Periodontal therapy level 2
Subgingival curettage/closed root planing
Perioceutics
Periodontal therapy level 3
Subgingival curettage/closed root planing
Perioceutics
Open root planing
The American Animal Hospital Association (AAHA) describes a 15 step dental prophylaxis protocol, which can be viewed at:
In this lecture, we will focus on Dr. Bellows (DVM, Dipl. ACVD) philosophy regarding the steps to prophylaxis/periodontal treatment. This method provides a thorough yet streamlined approach to a complete dental prophylaxis.
Step 1: Oral exam on the awake patient
In the exam room with the client
• Have the client visualize their pets' teeth (if the patient is compliant).
• Point out problems that you see and explain that there could be occult disease present as well.
• Get permission for treatment(s) at this time.
• Give the client an estimate with a low to high price range (for example, include extractions, medications which may be required).
• Make sure to get current contact number(s).
Step 2: Oral exam on the anesthetized patient
• Visualize the tongue and tonsils at the time of intubation.
Advertisement
• Examine individual teeth for mobility, fractures, malocclusion, enamel defects and periodontal disease. Wait to probe the sulcus depth until after calculus is removed.
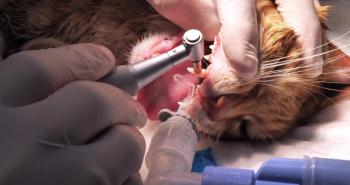
Step 3: Supragingival cleaning
• Gross removal of plaque and calculus from the crown surfaces. This helps to remove colonies of bacteria that are anchoring to the calculus; promoting a gram-negative environment in the oral cavity.
There are several types of scalers to choose from, however they are not created equally.
• Ultrasonic scalers
• Rotary scalers
• Sonic scalers
• Piezo scalers
Hand instruments are still important! These include hand scalers, curettes, and calculus forceps.
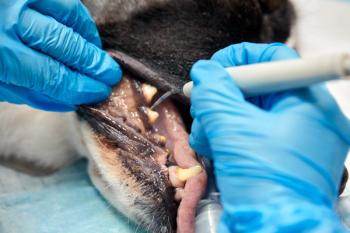
Step 4: Subgingival cleaning
• Removes plaque, dead tissue and calculus below the gingival margin.
Failure to remove this debris will promote the progression of periodontal disease!
Step 5: Polishing
• Smoothes out surface defects and removes missed plaque.
There are a variety of different polish pastes to choose from; ranging from fine through coarse texture, with or without fluoride and added flavors.
Step 6: Irrigation
• Removal of diseased tissue, plaque, and polishing paste from the sulcus and gingival pockets.
• Recommend using water or a 0.1-0.2% chlorhexidine solution. Effective irrigation can be achieved with a 3-in-1 dental system or a blunted 23-gauge needle and syringe.
Step 7: Fluoride/oravet treatment
• Fluoride should be applied to dry teeth, and should sit for at least 4 minutes to allow for penetration
• Oravet ™ can then be applied as a barrier sealant
Step 8: Post-cleaning exam
• Best time to examine each tooth individually.
• Periodontal probing checks the sulcus depth. Normal values are 1 to 3 mm in dogs and 0.5 to 1 mm in cats.
• Compressed air can be used to check the tooth surface for any missed calculus and/or plaque. A disclosing solution can also be used.
• Radiographs can be taken at this time to look for subgingival disease.
Step 9: Charting
• Recording should be completed before initiating therapy.
• Important findings that should be recorded on the patients oral chart include: missing, loose, or fractured (complicated and uncomplicated) teeth, discolored teeth, periodontal pockets and gingival recession. Tooth resorptive lesions including those diagnosed on radiographs should be recorded at this point.
Step 10: Therapy
Treatment options for dental abnormalities may include:
• Periodontal therapy, which includes closed and open root planing.
• Exodontics (Extractions)
• Endodontics, such as root canal or vital pulpotomy.
• Restorative dentistry can be done for near pulp exposure or enamel defects.
Step 11: Discharging the patient.
Home care instructions should ideally be typed up for discharging the patient.
These should include:
• Treatments performed that day
• Medications the patient will need
• Any restrictions, such as diet and exercise
• When to recheck
This is also a great time to go over the importance and instructions for daily brushing with the owner. The owner plays an important role in their pets' health care.
Step 12: Follow up care
• Important to see how home care is progressing, as well as reevaluate the patient's oral cavity.
• At this time, remember to encourage the client to continue home care.
References
1. The Practice of Veterinary Dentistry A Team Effort, Bellows, J., Iowa University Press, 1999: 108-119
2. Veterinary Dentistry for the Technician & Office Staff, Holmstrom, S., W.B. Saunders Company, 2000: 159-218
3. Veterinary Dentistry for the Small Animal Technician, Kesel, M., Iowa University Press, 2000:141-166
4. The Veterinarian's Companion for Common Dental Procedures, Lobprise, H & Wiggs, B. , AAHA Press, 2000: 47-62
Advertisement
Related Content
Advertisement

Latest CME


Advertisement
Advertisement
Trending on dvm360
1
FDA issues emergency use authorization for ivermectin solution to prevent screwworm in horses
2
Every 30 extra minutes under anesthesia raises complication risk in brachycephalic patients, underscoring the importance of peri-anesthetic management
3
From the CVO: I’m off the clock
4
Paws and profits: VetEvolve names first chief veterinary officer, NVA appoints two board members, and more updates
5