

|Articles|June 1, 2005
10 steps to scale like a pro
Proper professional dental prophylaxis is a must for every small animal practice. Prevention of periodontal disease can be accomplished only through regular professional care under general anesthesia. The following discussion details the essential steps in providing a thorough dental prophylaxis for our patients.
Advertisement
Proper professional dental prophylaxis is a must for every small animal practice. Prevention of periodontal disease can be accomplished only through regular professional care under general anesthesia. The following discussion details the essential steps in providing a thorough dental prophylaxis for our patients.
Step 1: client communication
A complete physical and oral examination of all cooperative patients should be performed prior to anesthesia. Assuming no physical abnormalities exist that would preclude anesthesia, any oral findings that should be resolved or investigated during the anesthetic episode should be discussed with the pet owner, and estimates for possible diagnostics and treatments should be given. Complete oral evaluations under anesthesia many times reveal additional pathology requiring dental radiography and/or further treatment. Therefore, it is imperative that owners are available by phone during the procedure so that any abnormalities can be relayed to the owner and permission granted to approach these problems during the same anesthetic episode. Some of the more common examples include periodontal pockets 4 mm or deeper, feline odontoclastic resorptive lesions, caries, mobile teeth, masses, missing teeth and fractured teeth.
Step 2: Minimize patient and operator exposure
Aerosolization is unavoidable with the use of mechanical scalers during dental prophylaxis, exposing both the staff and the patient to oral bacteria. Chlorhexidine solution may be used as a rinse prior to cleaning to decrease this factor and possibly diminish the degree of bacteremia. Protective glasses, gowns and face-masks reduce exposure as well and should be worn by the operator. Finally, proper insuflation of the endotracheal tube prevents aspiration of microbes by the patient.
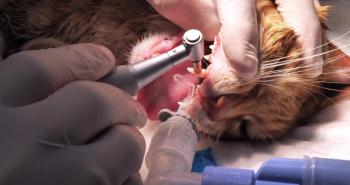
Step 3: gross calculus removal
Calculus removal forceps are used in cases with gross calculus accumulation. Small-breed extraction forceps also may be used for this purpose. One tip of the forcep is placed at the ridge of tartar that approximates the gingiva. The other tip is placed on the crown. Careful, controlled force is applied by leveraging the upper portion of the forcep toward the crown tip to fracture off the calculus mass (Photo 1). Care must be taken not to damage the tooth or the gingiva. The mouth may again be rinsed with chlorhexidine at this point.
Photo 1: The proper orientation of extraction forceps used to remove gross calculus.
Step 4: Supragingival (above the gum) calculus removal
Hand scaling is a viable technique for removal of supragingival calculus. Scalers have two cutting edges and a pointed tip and are intended only for supragingival use. Curettes also may be used.
Mechanical scalers are used more commonly now because they are quicker than hand scaling and produce similar results. Sonic, ultrasonic and piezoelectric mechanical units are widely accepted for supragingival and subgingival scaling and have many similarities. One important difference is the active portion of the working end of the instrument. Ultrasonic instruments are active throughout the entire working portion of the instrument with slightly more power toward the tip of the instrument. With piezoelectric units, most the active portion of the instrument is on the sides (at the 3 o'clock and 9 o'clock positions). These differences determine the most efficient contact point of the instrument and the tooth. Keep in mind that the tip should never be directed at the tooth surface (Photo 2).
Photo 2: Improper orientation of a mechanical scaler tip.
A feather touch is used with sonic and mechanical scalers. This avoids damage to the enamel. Although some micropitting occurs even with a light touch, the polishing step will help eliminate this. The tip should not be left in contact with the tooth for more than 15 seconds. Make sure that water is constantly bathing the tip to avoid potential thermal damage to the pulp. All tooth surfaces should be cleaned thoroughly with a sweeping or painting motion using the most active portions of the instrument.
It should be noted that studies have shown that rotopro burs used on high-speed handpieces can cause considerable damage to the tooth and should not be used for dental prophylaxis.
Advertisement
With both mechanical and hand scaling, a modified pen grasp should be used to reduce operator fatigue and maximize operator control of the instrument (Photo 3).
Photo 3: Modified pen grasp.
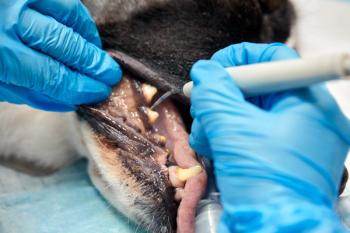
Step 5: Subgingival (below the gum) calculus removal
Curettes are blunt-ended hand instruments designed to be used both supragingivally and subgingivally. If periodontal pockets are present and cementum is exposed, tartar can be more tenacious and hard to remove. Hand scaling is used alone or as an adjunct to mechanical scaling to properly remove tartar and debris up to 5 mm subgingivally.
Beyond 5 mm, the area should be exposed with a periodontal flap to allow proper visualization and instrumentation; but a description of this approach is beyond the scope of this discussion. Special tips are available for mechanical units that are designed for subgingival use (Photo 4). Supragingival tips will damage the gum tissue and should be used only as designed.
Photo 4: A mechanical tip on a piezoelectric scaler designed to be used subgingivally.
Universal curettes are available with two cutting edges with the face 90 degrees to the shank of the instrument. It has two cutting edges, either of which can be used. Area-specific curettes, like the popular Gracey, have only one outer cutting edge (the convex edge) with the face forming a 60-70 degree angle to the shank (Photo 5). With the Gracey, only the outer convex cutting edge is used. Graceys have the advantage of multiple instruments providing different shapes that can adapt to different root configurations.
Photo 5: Gracey Curette
Curettes are placed in the pocket with the face parallel to the root. Once the bottom of the pocket is reached, the instrument is rotated so the face of the blade is angled at 45-90 degrees. A pull stroke from the pocket to the crown initiates scaling. This sequence is repeated until all calculus and debris are eliminated. The scaling stroke may be vertical, oblique or horizontal.
Photo 6: A dental explorer used to detect missed calculus subgingivally.
Following scaling, the tooth surfaces should be checked with a dental explorer to ensure no calculus is left behind (Photo 6). Visual inspection may be enhanced by drying the tooth with air to detect residual calculus. Particular attention should be paid to all subgingival surfaces. If this area is left unclean, the only benefit of the entire procedure is a cosmetic one. This is one reason why scaling without anesthesia is contraindicated.
Photo 7: Proper use of the disposable prophy angle.
Step 6: polishing and lavage
Polishing should include the entire tooth including the subgingival surface. Commercial polishing paste is placed on the tooth and in the prophy cup that is mounted on a prophy angle attached to a slow-speed handpiece. Disposable prophy angles with the cup already attached are also available (Photo 7). Once polishing is accomplished, a disclosing solution may be placed on the tooth surface to determine if residual plaque exists (Photo 8). Problem areas should be polished until they no longer retain the disclosing solution.
Photo 8: Stained areas of the tooth following application of disclosing solution indicate residual plaque.
Step 7: pocket irrigation
All prophylaxis paste should be removed from the tooth. Gentle saline lavage can be performed subgingivally using a blunt-ended canula and a 12-cc syringe to remove residual prophy paste and debris. Irrigates including chlorhexidine can be used for this purpose; however no studies exist at this time to show any medical benefits versus saline.
Step 8: fluoride treatment
Fluoride gel or foam provides anti-plaque activity and decreases tooth sensitivity. Fluoride is applied to the tooth surface for three to five minutes and then wiped (not rinsed) off.
Step 9: periodontal probing and charting
Probing and charting helps assess the periodontal status and general oral pathology present in each patient (Photo 9, p. 8). Information obtained will determine the course of treatment and the indication for dental radiology. Abnormal pocket depths are recorded along with any observable pathology, such as missing teeth, abrasion/attrition, fractures, masses, etc. The owner should be notified and permission obtained to perform appropriate diagnostics and treatment.
Step 10: client communication after the prophylaxis
One important step often neglected is communication following the prophylaxis. This can be done by a knowledgeable staff member or preferably the dental technician. Digital pictures can be taken before and after cleaning, and integrated into a client education sheet that is presented to the client at discharge (Photo 10).
Areas that require special attention during home care can be shown with arrows on the picture's discharge sheet. It is important for the veterinarian to evaluate the severity of the patient's condition in relation to its age to determine the proper interval between prophies. A patient with severe periodontal disease might need prophylaxis and periodontal therapy every three months, whereas a patient with gingivitis or mild periodontitis might require only yearly prophylaxis. Once established, this interval is presented to the client at discharge, incorporated into the discharge sheet and an appointment scheduled. This final step ensures maximum compliance with rechecks and home care. It also increases the perception of the procedure's value to the client.
Taking a step-wise approach to the dental prophylaxis will allow the dentistry service in your hospital "scale like a pro" and ensure maximal compliance for the best possible results for all of your patients.
Dr. Beckman is a fellow in the Academy of Veterinary Dentistry. He owns and operates South Florida Veterinary Dental Service in Punta Gorda, Fla.
Advertisement
Related Content
Advertisement

Latest CME


Advertisement
Advertisement
Trending on dvm360
1
Tornado (the dog) touches down at the emergency department
2
Every 30 extra minutes under anesthesia raises complication risk in brachycephalic patients, underscoring the importance of peri-anesthetic management
3
Paws and profits: VetEvolve names first chief veterinary officer, NVA appoints two board members, and more updates
4
From the CVO: I’m off the clock
5