Miller's knot methodology: figure 1
A step-by-step photo package illustrating application of a Miller's knot for veterinarians.
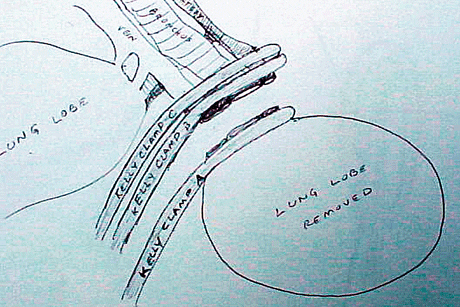
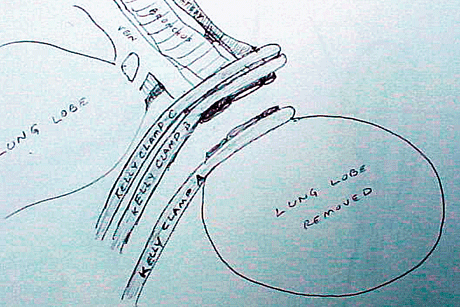
After the lung lobe needing resection is fully exposed via a lateral thoracotomy, parasternotomy or sternotomy, it is elevated and its connective ligament if present and loose areolar tissues are dissected from the main pedicle using fine-curved scissors.
With traction applied to the lobe being removed, 2 or 3 curved Halstead (for small animals 10 kg BW or less) or Kelly hemostatic forceps (for animals weighing > 10 kg) are applied across the entire pedicle, one right after the other except for a break between the last two distal clamps. Care is taken to make sure the clamp closest to the pedicle base is not impinging on other bronchial branches or lobar vessels.
The lung lobe is removed by cutting the entire pedicle with Metzenbaum scissors between the distal most clamps (Figure 1). The scissors tips are tilted slightly to produce a “tissue bumper” of 1-3 mm above the distal most hemostatic forceps. This bumper helps prevent the pedicle from sliding through the forceps.
This diagram shows the separation between the distal two clamps. Note the tissue bumper extending from the second distal clamp.
More in this package:
Applying a Miller's knot: step 1
Applying a Miller's knot: step 2
Applying a Miller's knot: step 3
Comparison to traditional technique


 in general practice")


